| FAQ | 
Overview
The POP LAN/Classroom platform allows you to manage your test bookings, such as starting or downloading a test, and mark candidates as absent.
- The Administrator Dashboard software is used to create invigilators & rooms, download & activate tests, and prepare & monitor learners' tests.
- The Invigilator Dashboard is a program used to start tests, mark learners as absent, print learner log-ins & attendance registers, & check test progress.
- The Test Player is where the learner logs in to sit their test.
- The Exam Centre Service allows local distribution of the software, including communication between the centre and the Pearson server.
This process assumes you have installed the relevant software and set the Test Player to LAN mode. If the platform has not yet been installed, please navigate to the installation guide.
Administrator Dashboard
Please click below to expand each section:
Logging in & selecting a server
|
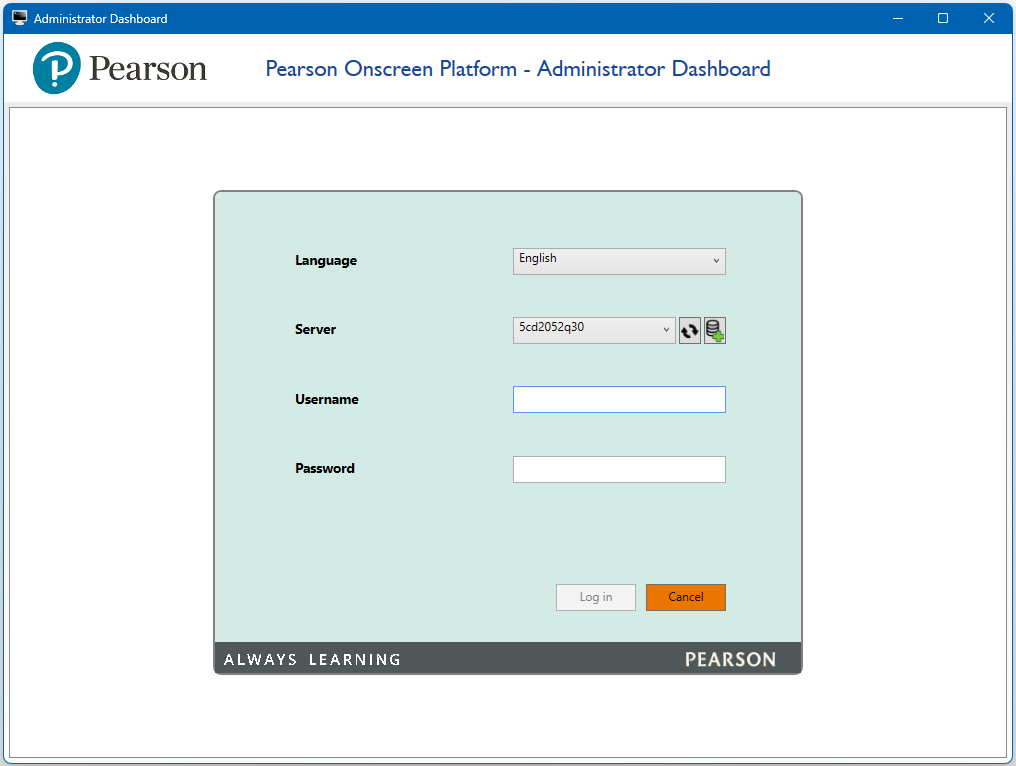
1. Launch the Administrator Dashboard.
2. From the login screen, ensure the correct Exam Centre Service server is selected from the Server dropdown box (it needs to match the Server selected on the Invigilator Dashboard). Enter your username and password, then click Log in:
 |
|
Creating invigilators
|
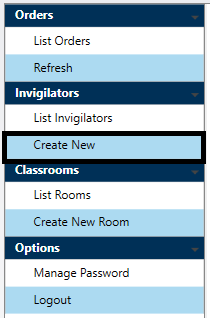
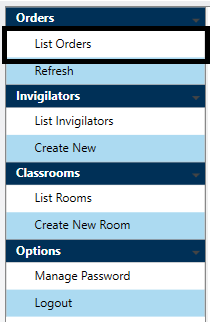
1. Under the Invigilators section, select Create New:
2. Complete the fields that appear: Login Name, First Name, Last Name, Password and Confirm Password. Place a tick in the Active checkbox and then click Create:
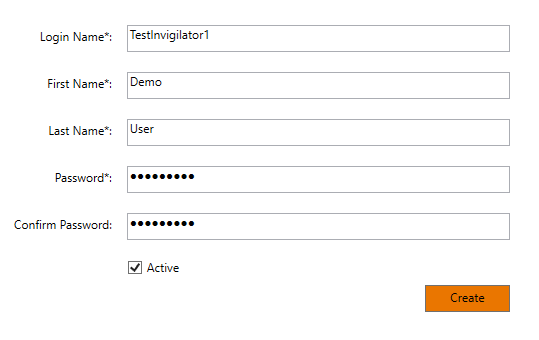
Please note: The password must be at least 8 characters in length and include at least 3 of the following types of characters:
- Uppercase letters (A-Z)
- Lowercase letters (a-z)
- Numerals (0-9)
- Special characters (e.g. ! £ ? # %)
|
|
Creating rooms
|
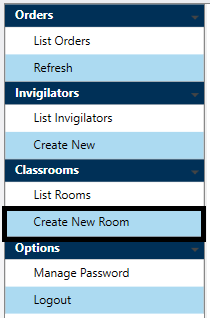
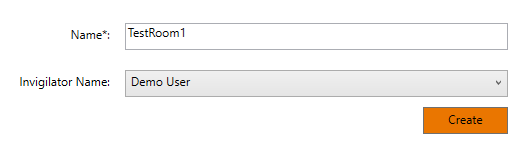
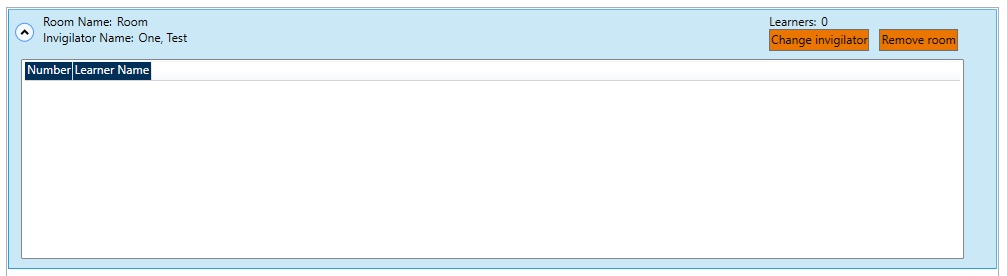
1. Under the Classrooms section, select Create New Room:
2. Type the Room name in the Name box, then select the invigilator from the Invigilator Name dropdown box and click Create:
 |
|
Downloading, activating & preparing the test package
|
1. Under the Orders section, select List Orders:
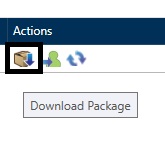
2. Under the Actions column, select the Download Package icon:
You can use the From and To date range options to filter your list of orders.
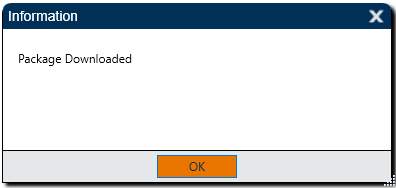
3. The following pop-up message will appear. Click OK to proceed:
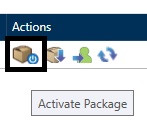
4. Navigate back to the Orders tab. Under the Actions column, select the Activate Package icon:
5. On the next screen, confirm the activation by clicking Activate:

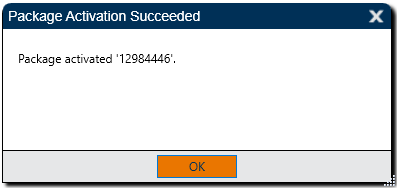
6. The following pop-up message will appear. Click OK to proceed:
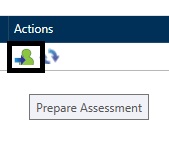
7. Navigate back to the Orders tab. Under the Actions column, select Prepare Assessment:
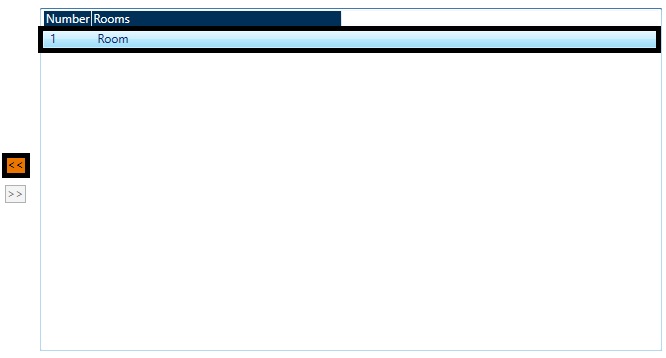
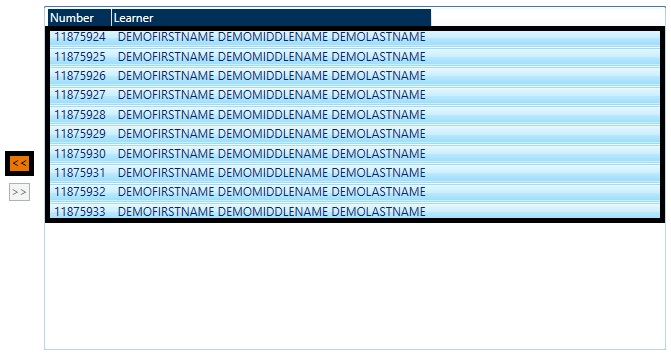
8. The Order allocation tab will open. In the top-right section, select the relevant room and then click the << button to move the room across to the main section:
9. In the main section, select the dropdown arrow on the room to expand the selection:
10. In the bottom-right section, select the candidates you wish to allocate to the room and then click the << button to allocate them:
You can select more than one by holding the Shift or Ctrl keys while clicking.
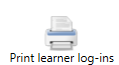
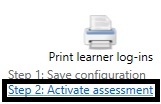
11. At this point, you can click the Print learner log-ins icon (found towards the top-right of the window) to get a list of the learner and order numbers for the test:
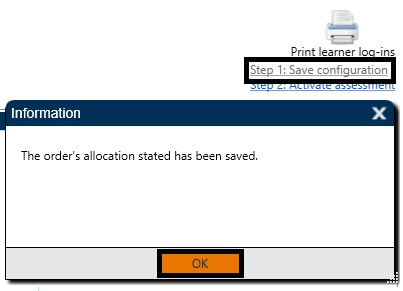
12. Select Step 1: Save configuration (found towards the top-right of the window) to save your progress. This will allow you to navigate out of the Order allocation page and return at another time. You will get a message that the order's allocation state has been saved:
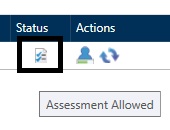
13. Once all the learners are assigned to rooms, with a unique invigilator in each room, press Step 2: Activate Assessment and you will get a message that assessment is now allowed:
When you look at the order status, it will now show "Assessment allowed":
 |
|
Monitoring learner progress
|
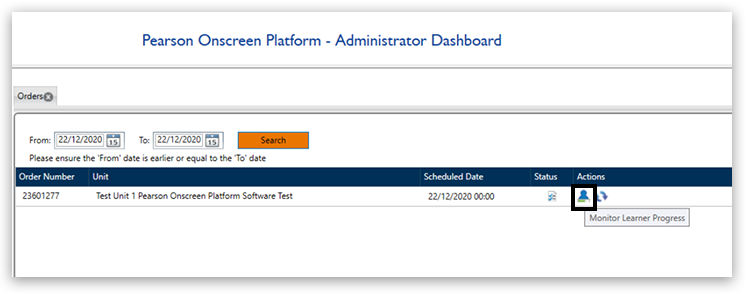
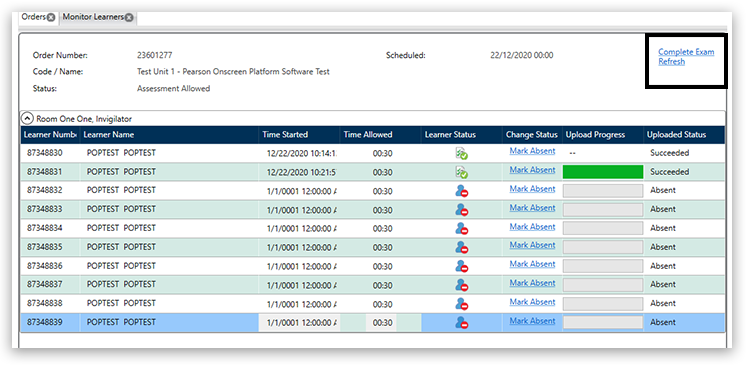
Under the Actions column, selecting the Monitor Learner Progress icon will allow you to monitor progress:

Once you have reached the Monitor Learner Progress screen, there is no further action to be taken on the Administrator Dashboard until the tests are completed.
Once the tests are completed, the response files will automatically upload back to Pearson, provided the Exam Centre Service PC has an internet connection. The Uploaded Status column will shows as Succeeded.
*If the Exam Centre Service PC does not have an internet connection, then the Uploaded Status will show as Ready To Upload. Once the internet connection is established, click on Upload Answers, found towards the top-right of the screen. This will send the response files back to Pearson.
Once all learners have either completed the test or been marked absent, you can select the Complete Exam option.
|
|
Test completion
|
In most cases, the learner test will upload automatically.
1. Once the learner has completed the test, the Invigilator Dashboard Exam State will update to show that the test response has been uploaded:

2. If, for any reason, the Test Player loses connection with the Invigilator Dashboard, it can usually bypass the Invigilator Dashboard and still upload. On the Administrator Dashboard, select Monitor Learner Progress under Actions:
As long as there is a green tick displayed, the test response has uploaded successfully:
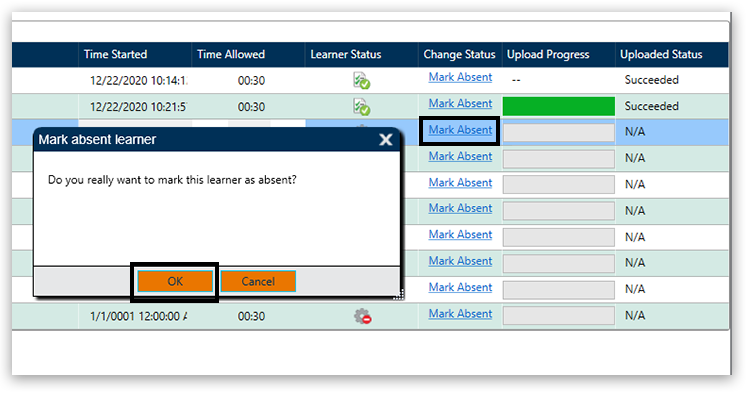
3. Any learners in the booking who have not sat the test should be marked absent:
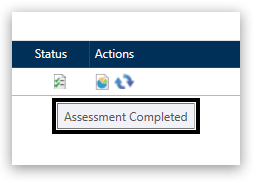
4. Once all learners have either completed the test or been marked absent, you can select the 'Complete Exam' option:
5. The status then updates on the Orders Status to "Assessment Completed":
 |
|
Invigilator Dashboard
Logging in & selecting the server
|
1. Launch the Invigilator Dashboard.
2. From the login screen, ensure the correct Exam Centre Service server is selected from the Server dropdown box (it needs to match the Server selected on the Administrator Dashboard). Enter your username and password, then click Log in:
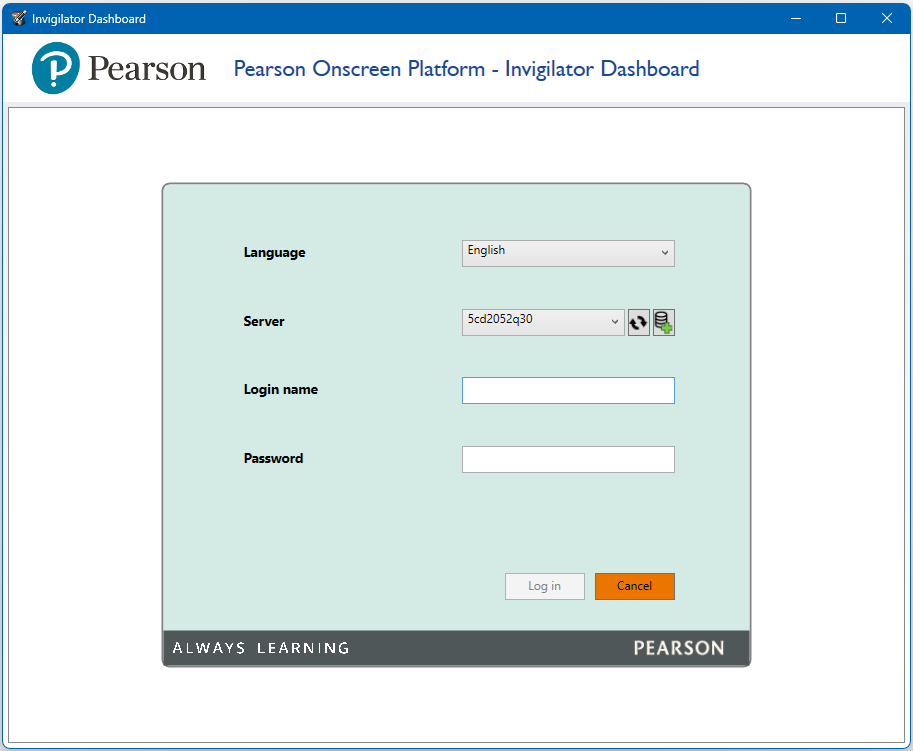
Please note: The Invigilator Dashboard user details are created on the Administrator Dashboard. Please see the Creating invigilators section for more info.
|
|
Selecting the order
|
Once logged into the Invigilator Dashboard, select the relevant order from the list, found towards the left of the screen:
Before the learner can start the test, you will need to give them their Learner Number and Order Number. If you did not print the learner log-ins during test preparation, you can use the Print log-ins icon to print/download this information:
 |
|
Starting the test
|
1. The learner logs into the Test Player using their Learner Number and Order Number:
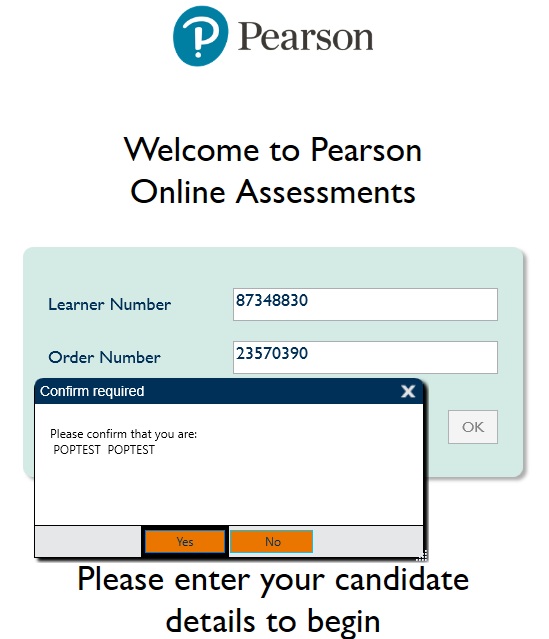
The learner will be asked to confirm their details. Click Yes to confirm, or No if the details are incorrect.
2. The learner will then see the message "In order to proceed the invigilator must start the test":
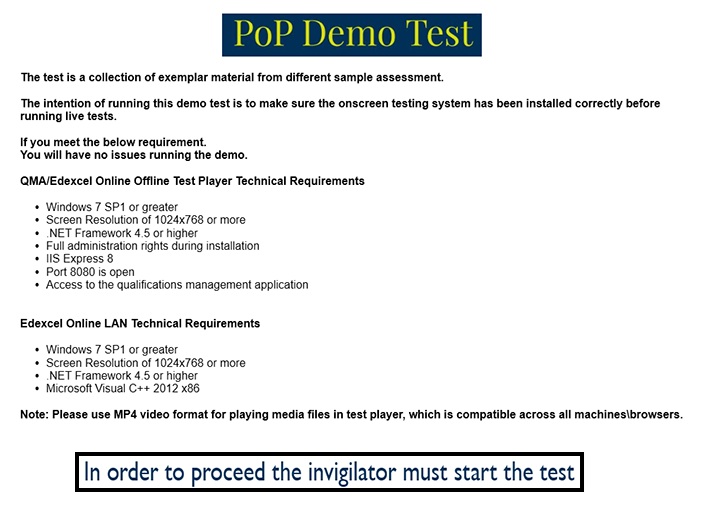
On the Invigilator Dashboard, the learner's Exam State will change from Not Started to Awaiting Approval. Their Connectivity State will also change from Offline to Online.
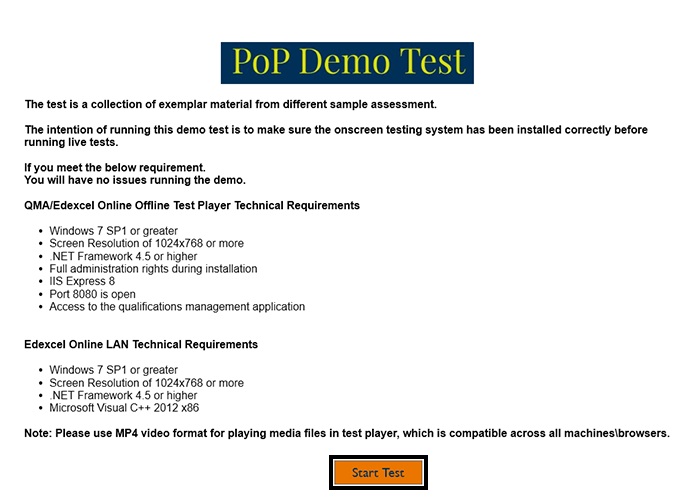
3. From the Invigilator Dashboard, select the Learner and press the Start option:

4. The learner will now be able to click Start Test on the Test Player and begin their test:
 |
|
Managing tests
|
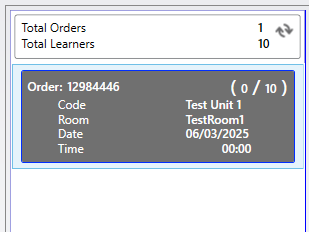
During a test, you can see how much time the learner has left and how many questions have been answered:

Marking learners as absent
You can mark a learner as absent by selecting the learner and clicking on the Mark Absent/Present icon:

If you mark a learner as absent in error, repeating the process will change their status back to Present.
Pausing the test
If you need to pause a test, select the relevant test(s) and click the Pause option:

This will revert the learner's Test Player back to the log-in screen. To continue the test, the learner re-enters the relevant details on the Test Player and the invigilator unpauses the test on the Invigilator Dashboard.
Please note: You may be asked for a reason for the pause, as well as an "invigilator key". The invigilator key is your Invigilator Dashboard password.
|
|
Test Player
Toolbar guidance
|
Notepad

- The size and colour of the font for your notes can be adjusted using the controls provided.
- Notes you make will be kept for the duration of the test. If you leave a question and return to it later, your notes will still be there.
- You will need to open the notepad again via the toolbar to see them. However, they will always be available to you during the test.
- Notes you make are specific to the question on which they are made, so can only be seen when on that question.
- Notes will not be marked and will be discarded at the end of the test.
Calculator

- The calculator icon will only appear if it is allowed for that question.
- You can copy your calculations directly into the working box when the question requires it, with a button on the calculator called "Copy to Working Box".
- The calculator is keyboard accessible and can be operated using the tab or arrow keys to move to numbers or symbols and the spacebar to select.
Ruler

- The ruler icon will only appear if it is allowed for that question.
- You can drag and drop the ruler around the screen using the mouse.
- The radial button found towards the bottom-right of the ruler can be used to adjust the angle.
Protractor

- The protractor icon will only appear if it is allowed for that question.
- You can drag and drop the protractor around the screen using the mouse.
- The radial button found towards the bottom-right of the protractor can be used to adjust the angle.
|
|
Accessibility options
|
Accessibility panel

Accessed by clicking the icon on the toolbar. Alternatively, it can be accessed by pressing Ctrl + E.
Zoom & move options
 
- Located within the accessibility panel
- Adjust the zoom level using the plus (+) and minus (-) buttons provided
- Zoom level can be reset to the default level using the reset button
- The "Move" arrows can be used to move the screen
Colour filters
- Located within the accessibility panel.
- These are intended to mimic the action of coloured overlays used by some dyslexia sufferers, who find them useful when interacting with text-based materials.
- However, some of the videos and animations used within our tests are difficult to see clearly when using the filters.
- On questions where there is a video or animation, candidates are advised to temporarily turn off the filter they are using whilst viewing the video or animation and re-activate the filter once they have viewed it.
Keyboard shortcuts
- Ctrl + D - next question
- Ctrl + S - previous question
- Ctrl + Q - Open question navigator (repeat to close). The arrow keys can be used to choose the question
- Ctrl + E - Open the accessibility panel (repeat to close)
- F2 - Switches the focus between the question and the toolbar
- Tab - Move forward between items
- Shift + Tab - Move backwards between items
- Spacebar - Select
- Plus (+) & Minus (-) - Adjust the zoom level of the screen
"Drag & drop" questions
- Keyboard users should tab to and select the option that they think is correct, or the area they want to drag something to.
- Tabbing to and selecting the appropriate counterpart, label, or drop area will complete the movement.
"Dropdown box" questions
Keyboard users should tab to the drop-down box they require and use the up and down arrow keys to choose the answer they wish to select.
Enlarging visual media
Right-clicking with the mouse on visual media, such as pictures and diagrams, toggles between normal and full-screen view.
|
|
Section-based tests
|
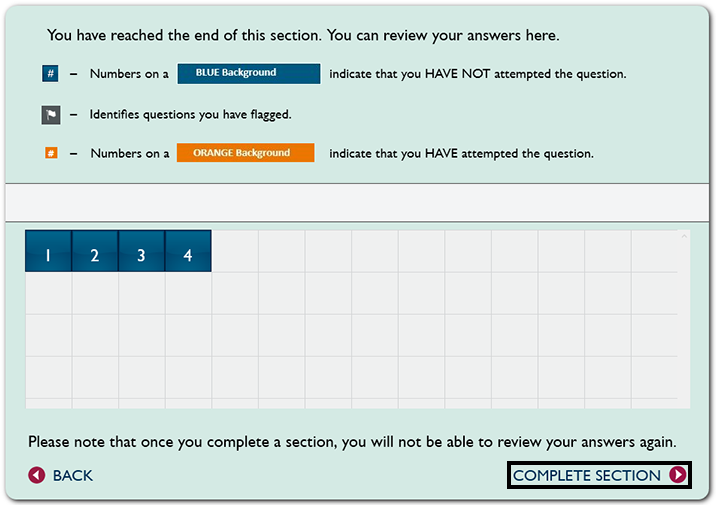
For section-based tests, once the learner gets to the end of a section, they will have a chance to review their answers for that section. However, after moving on to the next section there is no way to go back to the previous section:
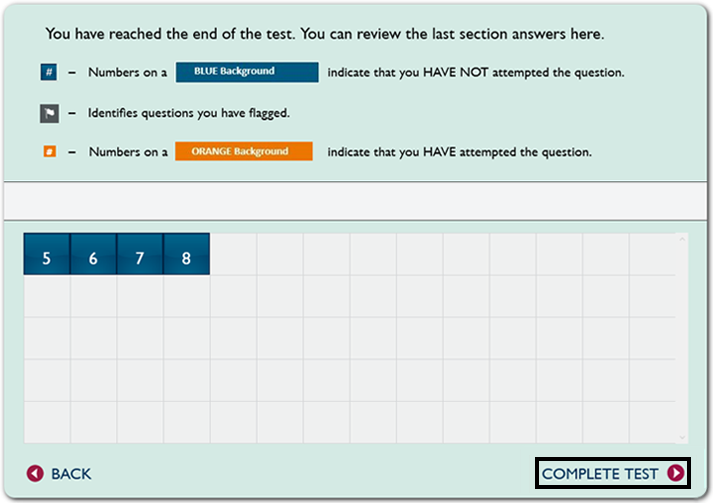
There is a chance to review the learner's answers at the end of the test. If it is a section-based test, the learner can review the answers from that section:
 |
|
Return to the support index. |
|
|---|