| FAQ | 
Overview
This article gives an end-to-end overview of the steps required to prepare the assessment materials, run the onscreen test and submit candidate evidence for Digital Functional Skills online assessments.
Please note: If you haven't run Onscreen Digital FS tests before, then you must complete the Onscreen Testing Declaration Form before you can run live tests.
This guidance applies to tests that have already been booked via Edexcel Online; for guidance on how to book an onscreen test, please see: Onscreen Testing: Booking an Onscreen Functional Skills Test.
The assessment for Digital Functional Skills takes place using the Digital FS online test player. For software installation guidance, please see: Digital Functional Skills: Software Installation Guide.
Important note: the FS Digital Test Player runs in an online environment, so a strong, stable and constant internet connection will be required throughout the test. The Test Player must not be closed at any point during the test.
About the assessment
Please click below to expand each section and view support:
Structure of the assessment
|
The assessment has two sections:
- Section A is a knowledge check with 10 multiple-choice questions. Candidate responses here are uploaded to Pearson for grading when the assessment is over.
- Section B is a task that requires candidates to make changes to the associated set of Data Files for the assessment. These completed Data Files must be uploaded for each candidate to Pearson via the Digital FS secure portal and accessed via Edexcel Online.
Full details on the structure of the assessment can be found in the specification.
Candidates should be familiarised with the structure and nature of the assessment by completing the SAMs (located under Sample assessment material) and Practice Papers (located under Onscreen tests) available on our website before sitting a live assessment.
|
|
How to conduct the examination
|
Preparing for and starting the assessment
Access requirements for the Digital FS Portal
|
You must first be logged into Edexcel Online in order to access the Digital Functional Skills secure portal.
To sign in, please go to Edexcel Online; you will be asked to enter your usual Edexcel Online credentials, and once you click sign in, a verification code will be sent to the Pearson Authenticator app.
For further information, including downloading the app to your mobile device and using it to complete the sign-in process. Please see Pearson Portal Authenticator for details.
To access the Digital FS Portal through Edexcel Online, you will need to have been given additional user privileges by an authorised member of staff at your centre.
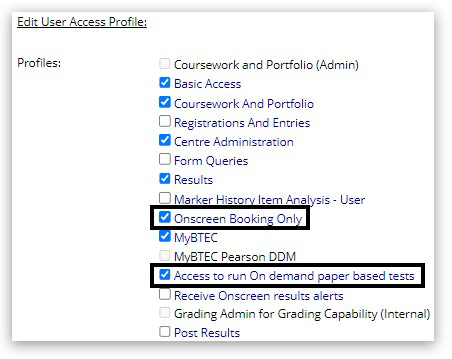
Centre Administrators can add this feature in Edexcel Online to new and existing users of the system by ensuring 'Onscreen Booking Only' and 'Access to run On demand paper based tests' are selected below 'Edit User Access Profile', for example:
For support accessing Edexcel Online or managing user account options, please see the Edexcel Online (EOL) Accounts Support Index.
|
|
Downloading the Data Files from the Digital FS Portal
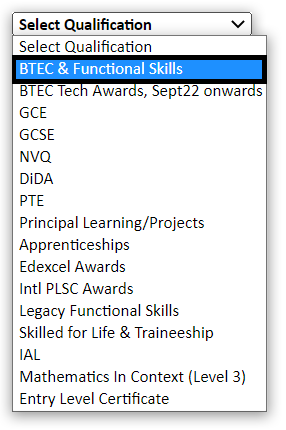
- Log in to Edexcel Online. Select 'BTEC & Functional Skills' from the drop-down menu:
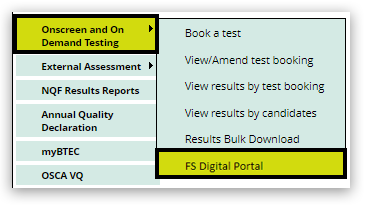
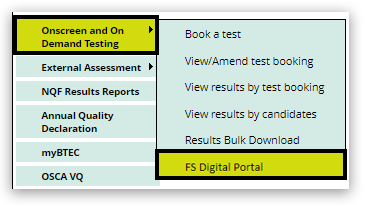
 - From the left-hand side of the screen, select 'Onscreen and On Demand Testing'.
From the sub-menu select 'FS Digital Portal':
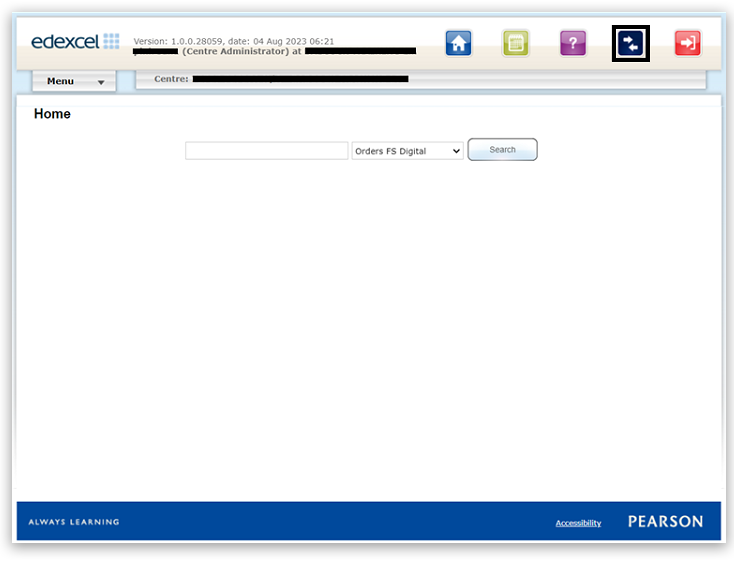
 - This will direct you to the FS Digital Portal. If you have tests booked at multiple sites, you can view these by clicking the icon with 2 arrows:
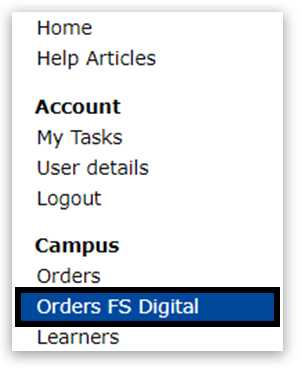
 - From the home page, click on the drop-down Menu and select 'Orders FS Digital':
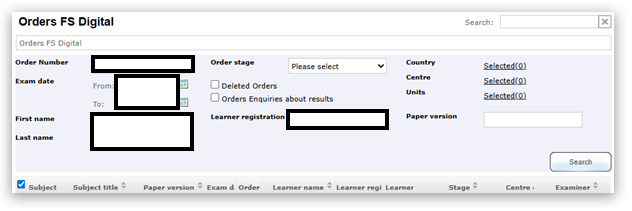
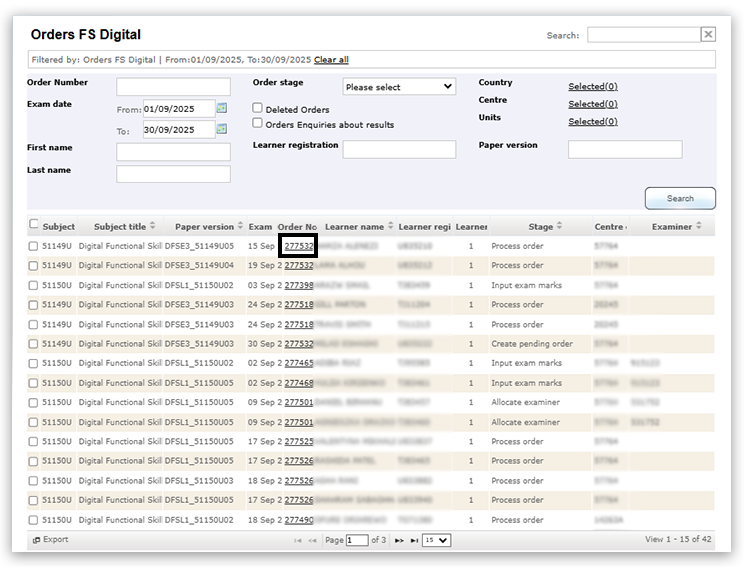
 - The following screen will appear. Enter your booking details in the appropriate fields to search for available test bookings. For specific booking details you can search by Order Number, Exam date, First name, Last name or Learner registration.
Please note: we have added extra search criteria here based on the candidate 'First Name', 'Last Name', 'Learner Registration', and 'Paper Version' to make it easier to locate the correct test information.
You can also search for all available bookings within a time period using the Exam date 'From' and Exam date 'To' entry fields:
 - Click on the required 'Order No' to view more details and to download the Data Files.
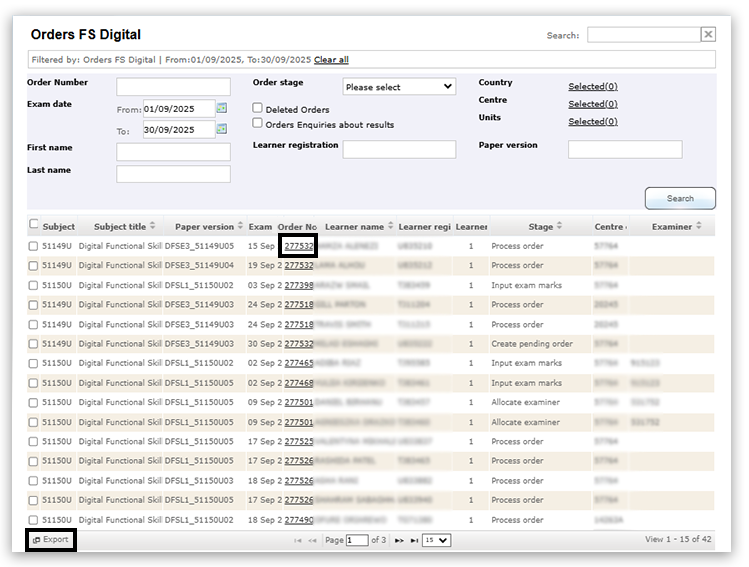
The Export button at the bottom of this list allows you to download an offline Excel sheet with this information to use for ease of administration, for example, recording the Order No and Learner number required to run the test for each candidate, please see Step 4 in Running the Onscreen Test via Pearson Assessor Dashboard (PAD) for more information.
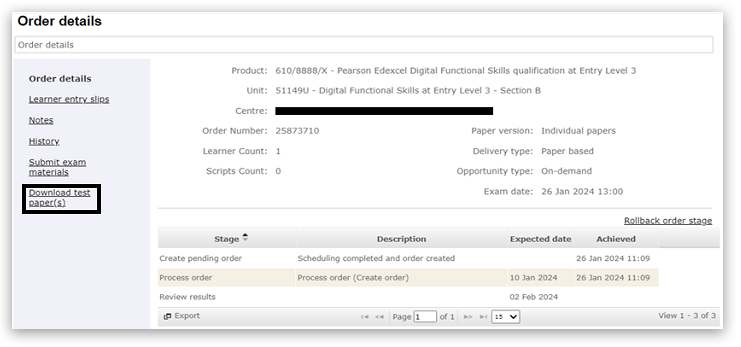
IMPORTANT: you can only download test materials up to 24 hours before the scheduled time. Outside of this window the following options will not be available. - Click 'Download test paper(s)':
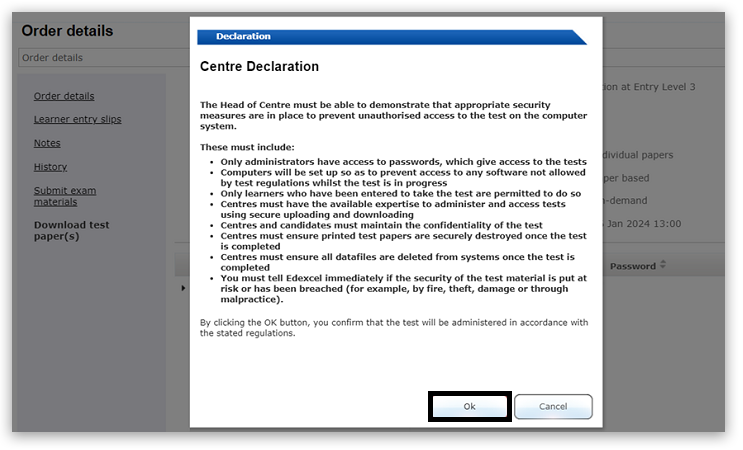
 - Click on the paper code reference at the bottom and select 'Ok' to accept the declaration:
The Data File will then download as a zip file.
Once you have downloaded the Data Files you will need to set up an assessment folder for each candidate to access the files during the assessment. Please see the next section for full instructions on how to set up the Data Files correctly.
|
|
Setting up the Data Files for assessment
- Create an assessment folder for each candidate or your centre's server using the following naming convention:
CandidateName_RegistrationNumber_CentreNumber, for example,
 - Then go to your downloads, locate and extract the Data Files into the candidate's assessment folder. Please note: the Data Files must be extracted from the zip file to allow learners to save their documents.
Expand for a step-by-step on how to extract the Data Files.
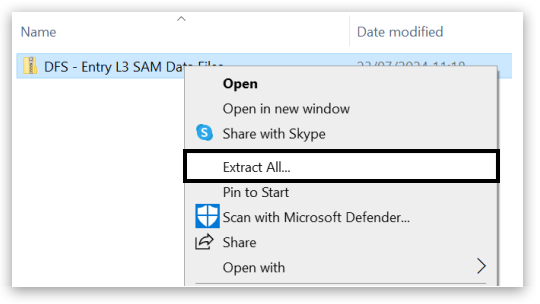
- Locate the data files, then to extract the files, right-click on the data file folder, go to Extract All.
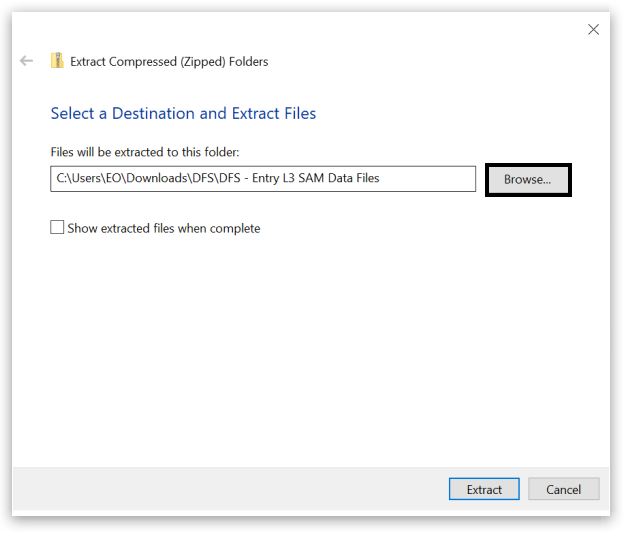
 - A new window will open up prompting you to select where to save the extracted files. Click Browse to navigate to the candidate's assessment folder.
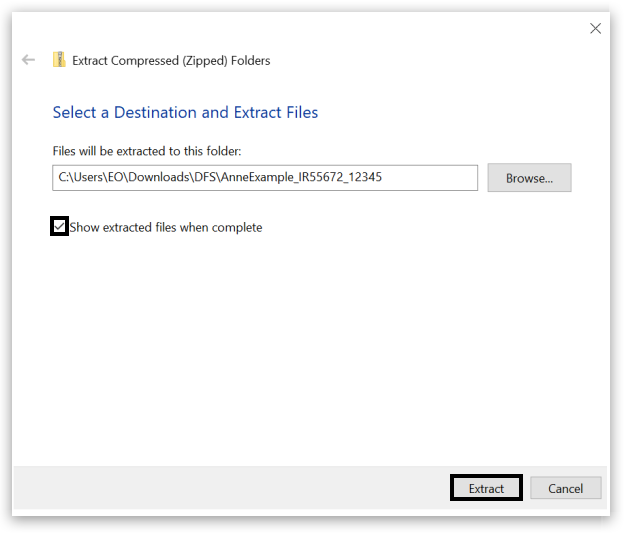
 - Once you have selected the location to extract the files, click Extract.
Tick the box Show extracted files when complete to check the files have saved to the correct location.
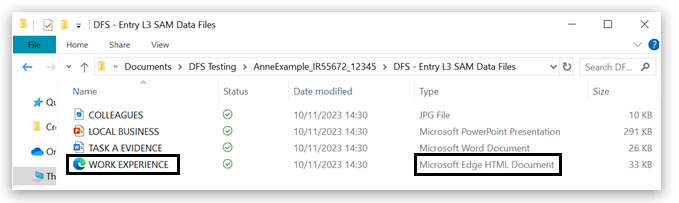
A new window will appear, allowing you to check that the correct files are showing for the candidate.

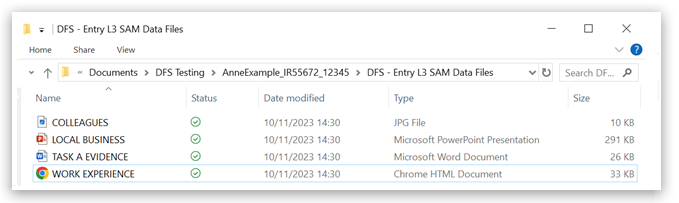
- Before running any assessments, you should check that the Data Files are accessible. The Data Files contain an HTML Document which must be opened in the web browser to complete the interactive form.
To do so, make sure the Data Files are available in the local file storage of the assessment computer and are accessible via Documents/File Explorer. In the example below the HTML Document is called WORK EXPERIENCE and the icon shows that it is set to open in Microsoft Edge.
Please note: the HTML Document will look different depending on which browser is set to default, e.g. using a Chrome browser will look like this:

Important: If you try to use an online file platform, such as OneDrive, to open the .html file, then by default this will open within the file platform itself, and you will see the following error message. The Data Files must be opened from local storage to prevent this.
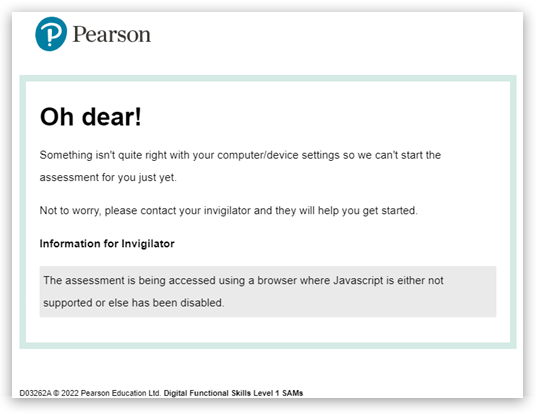
You will also see the above error message if JavaScript is not enabled within your chosen web browser. To enable JavaScript on different web browsers, please refer to the following article How to Turn On Javascript. - Prepare a testing email account to be used during the assessment for each candidate.
This account should not be used for anything other than testing purposes and must be wiped completely between assessments. Testing email accounts may be re-used at a later date only if they have been completely wiped of all evidence of assessments. Candidates must not use their own email accounts for the assessments.
|
|
Running the Onscreen Test via Pearson Assessor Dashboard (PAD)
|
During the assessment
Support for technical problems
- The test player must not be closed at any point during the assessment. If a learner closes the test player, the test cannot be recovered. The player only allows for continuation if there is a loss of internet connection or if the test is paused. However, in both cases, the test player must not be closed. If this happens, then the test must be rebooked.
- Technical support should be available during the test, and the invigilator must be able to summon help without leaving the exam room if any of the following occur:
- If the system is not up and running successfully at the scheduled start time, the assessment should be delayed by no more than 15 minutes for the problem to be resolved. After this time, the on-screen assessment should be rescheduled when the fault has been rectified and the system tested.
- If there are technical difficulties with individual computers or the whole centre system during the assessment, and if the failure cannot be rectified within 30 minutes, the on-screen assessment should be abandoned. A further set of on-screen assessments should be scheduled when the fault has been rectified and the system tested.
For troubleshooting specific issues, please see: Digital Functional Skills: Test Player Troubleshooting
|
|
Completing the HTML form
|
One of the tasks in Section B requires candidates to complete an online form. This is accessed by opening the .html file from the Data Files. This file must be opened in the browser, please see the section, Setting up the Data Files for assessment, for instructions on how to do this. The task instructions will state the file name to open and complete the form, e.g.
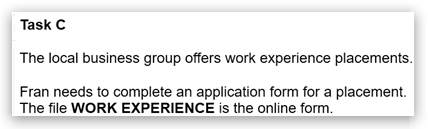
Candidates will need to open the WORK EXPERIENCE file to access the online form.
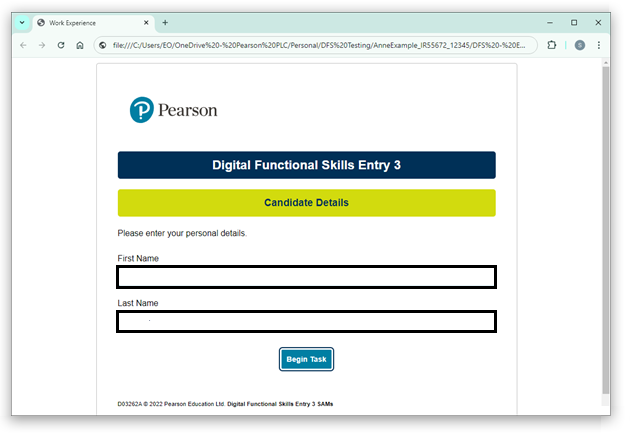
Candidates must enter their First Name and Last Name correctly on the first page of the HTML form to allow their work to be identifiable. The completed HTML form will be saved in the format 'FirstName_LastName_Completed.html'.
The candidate can then click Begin Task, and complete the task as required:
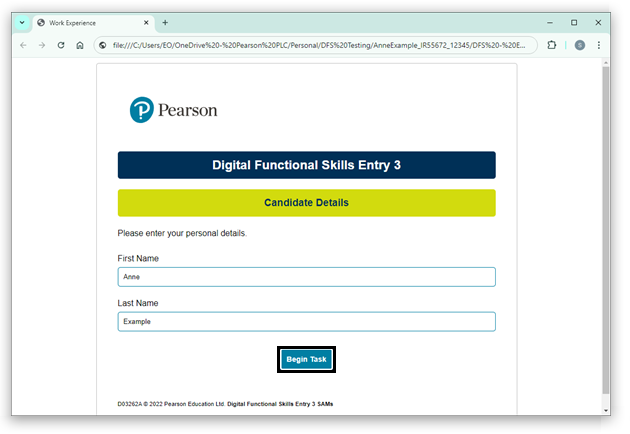
Once the candidate has completed the HTML form, at the bottom they need to click Submit and save a copy to download it. See the next section for instructions on how to locate the completed .html file.

|
|
Locating the completed HTML form
|
Once the candidate clicks 'Submit and save a copy' the completed form will download.
Where the file downloads will depend on your centre's browser settings for downloads. By default, files will be saved in the Downloads folder unless you have enabled the setting to prompt where to save this file. Candidates should be made aware of your centre's settings before the assessment to know where they can expect the file to be saved and move it into their assessment folder.
Your browser may show a pop-up upon download for easy navigation to where the file has downloaded. Please note: this will look different depending on which browser you use. In Google Chrome, the downloads can also be accessed by clicking on the download symbol and then locating the file, which will be saved in the format 'FirstName_LastName_completed.html' and then clicking on the Show in folder icon to view the file, e.g.
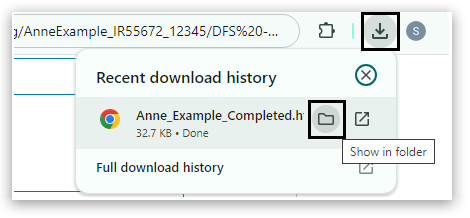
The completed HTML file Anne_Example_Completed.html is now showing in the Downloads folder and should be copied into the candidate's assessment folder, ready for upload to Pearson.
|
|
After the assessment
Ensure all completed Data Files are saved within the Candidate's assessment folder
|
This is particularly important in relation to the HTML Document, which by default will save in the downloads folder once complete as FirstName_LastName_completed.html.
The candidate's assessment folder should be checked to see if it contains a completed HTML file. If there is no named HTML file in the candidate's name in their folder then the file must be copied into the candidate's assessment folder before upload to Pearson. Marks will not be awarded for missing evidence.
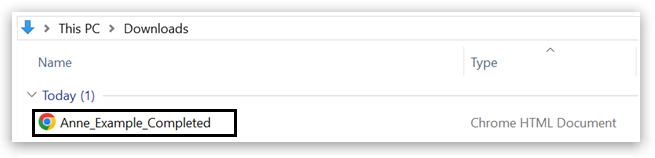
In the below example, only the original HTML file, 'WORK EXPERIENCE', is present, so the Downloads folder needs checking too.
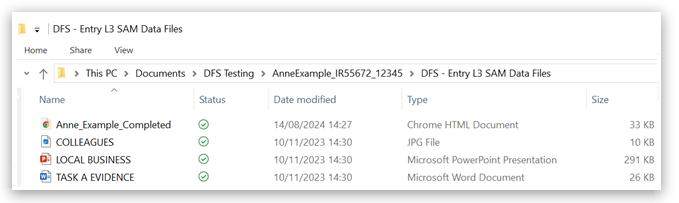
The Downloads folder shows there is a completed HTML file, Anne_Example_Completed.html, matching the candidate's name. This needs to be copied into the assessment folder before upload.

Once the completed .html form has been copied into the assessment folder, it is now ready for upload, as shown below:
Tip: To avoid centre staff having to do this for each candidate after the assessment, candidates should be given exam technique preparation in advance, explaining where to locate their completed form and how to copy this into their own assessment folders during/at the end of the assessment.
|
|
Uploading completed candidate Data Files to the Digital FS portal
- Locate the assessment folder for the candidate and check it is named correctly. The naming convention is as follows: CandidateName_RegistrationNumber_CentreNumber
- Right-click on the folder.
 - Scroll down to Send to then click on 'Compressed (zipped) folder':
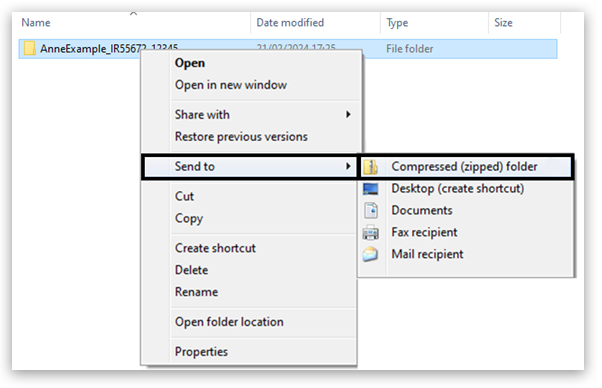
A compressed zipped folder (copy of the original folder) will appear. An example is shown below:
 - Log into Edexcel Online to access the FS Digital Portal. Select 'BTEC & Functional Skills' from the drop-down menu:
- From the left-hand side of the screen, select 'Onscreen and On Demand Testing'.
From the sub-menu, select 'FS Digital Portal':
 - From the home page, click on the drop-down Menu and select 'Orders FS Digital':
 - The following screen will appear. Enter your booking details in the appropriate fields to search for available test bookings. For specific booking details you can search by Order Number, Exam date, First name, Last name or Learner registration.
Please note: we have added extra search criteria here based on the candidate 'First Name', 'Last Name', 'Learner Registration', and 'Paper Version' to make it easier to upload the required test materials.
You can also search for all available bookings within a time period using the Exam date 'From' and Exam date 'To' entry fields:
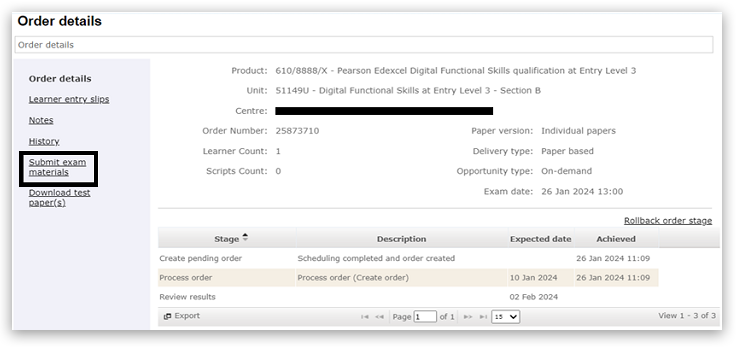
 - Click on the 'Order No' you want to upload the learner's folder to:
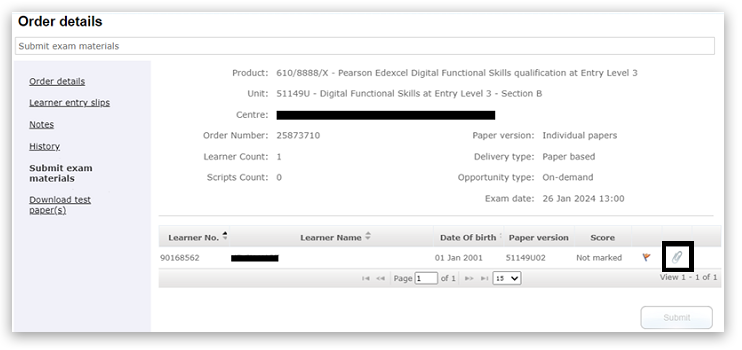
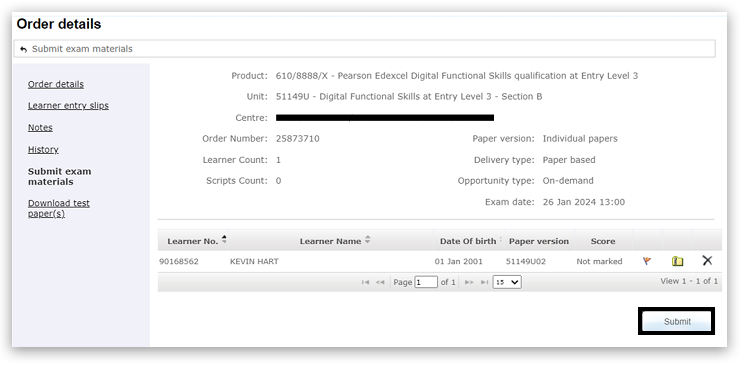
 - The Order details will appear. From the left-hand side of the screen, click 'Submit exam materials' to access the upload screen:
 - To upload materials, click on the paperclip icon on the right-hand side of the screen:
 - This will open a new popup window. Click on 'Select', then browse to the zipped (compressed) folder that contains the learner's test:
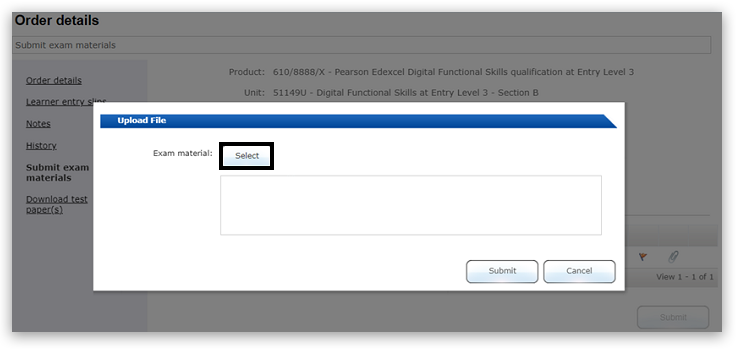 - Click OK / Open to upload the chosen folder.
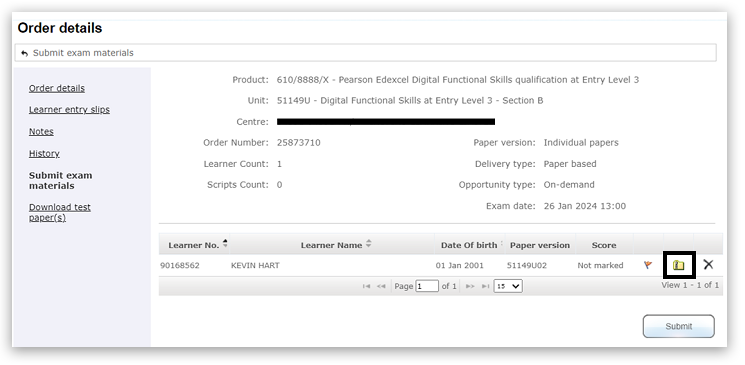
Once the folder is uploaded successfully, a shortened version of the file name will be shown, and a red cross will appear on the right-hand side:
![Upload File interface for exam materials. 'Select' button next to 'Exam material:'. A ZIP file named 'Data-F...CT-.zip [62.9 KB]' is listed with delete and download icons on the right of it. Buttons at bottom: 'Submit' and 'Cancel'.](/uk/servlet/rtaImage?eid=ka0aV000000V98f&feoid=00Nb000000A84sO&refid=0EM5p00000D4Ce7)
If an incorrect folder has been uploaded, click on the red cross to remove the folder and then repeat steps 11 - 12 to upload a new folder.
![Upload File interface for exam materials. 'Select' button next to 'Exam material:'. A ZIP file named 'Data-F...CT-.zip [62.9 KB]' is listed with the delete 'cross' button highlighted.](/uk/servlet/rtaImage?eid=ka0aV000000V98f&feoid=00Nb000000A84sO&refid=0EM5p00000D4CeH) - When the correct file has been uploaded, Click 'Submit':
![Upload File interface for exam materials. 'Select' button next to 'Exam material:'. A ZIP file named 'Data-F...CT-.zip [62.9 KB]' is listed. The 'Submit' button at bottom is selected..](/uk/servlet/rtaImage?eid=ka0aV000000V98f&feoid=00Nb000000A84sO&refid=0EM5p00000D4CeM)
You will then be returned to the order screen. The paperclip icon has now been replaced by a zip file icon to show that a file has been uploaded:
 - When you have uploaded all the learner work, click 'Submit' at the bottom of the order details screen to submit the order for marking:
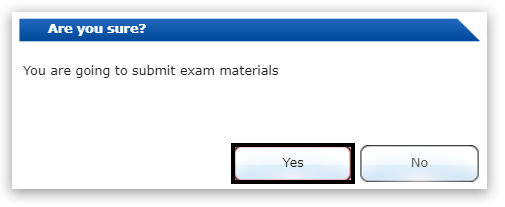
 - This will open a pop-up for you to confirm the submission. Click 'Submit' again to send the learner's work for marking:
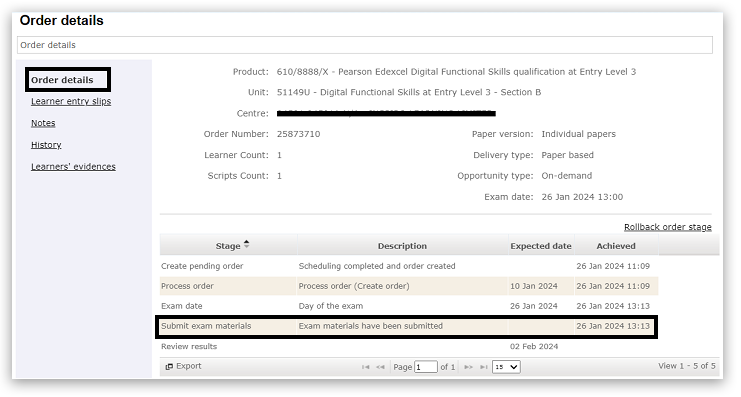
 - For confirmation, click on 'Order Details' from the left-hand menu options. You will see a record has been added at the bottom stating 'Exam materials have been submitted' and when this took place:
To submit work for multiple learners, repeat steps 7 to 15.
|
|
Maintenance of each testing workstation and testing email account
|
Each testing workstation must be wiped to ensure test security is maintained. To do this, both the email account and the local file storage on the computer need to be cleared of all test content. Any scrap paper should also be collected and destroyed.
Centres must ensure that:
- all contacts are deleted from each email account
- all drafts and sent messages are deleted from each email account
- the trash/bin folder is emptied on each email account
- no other folders in the email account contain any content that could be used by candidates
- the 'Downloads' folder on each computer is checked to ensure that any HTML file present here has been copied over to their user folder. Then, the HTML file and all other files in the downloads should be deleted and emptied from the 'Recycle Bin'.
- no data files remain on the computer after the assessment has finished and candidate work has been transferred to secure storage or uploaded to Pearson.
|
|
Marking a learner as absent via Pearson Assessor Dashboard (PAD)
|
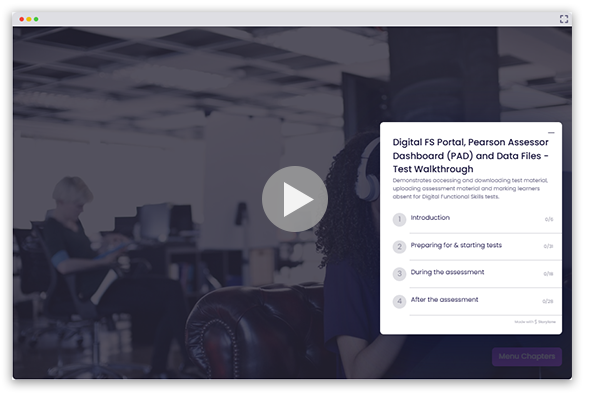
Interactive demonstration
Digital FS Portal, Pearson Assessor Dashboard (PAD) and Data Files - Test Walkthrough
|
Click the image below to access the demonstration.
|
|
Related Articles:
Digital Functional Skills: Software Installation Guide
Digital Functional Skills: Test Player Troubleshooting
Digital Functional Skills: Instructions for Conducting Examinations (ICE)
Digital Functional Skills: FAQs
Onscreen Testing: Booking an Onscreen Functional Skills Test
Onscreen Testing: Amending/Deleting Onscreen Tests
Back to Functional Skills: Support Index |
|
|---|