| Detailed Instructions | How to Register Test Takers for PEIC Qualification - Detailed step-by-step guide
Please click each section to view support:
General Information
|
Pearson must be informed if any member of the school's staff, e.g., a superintendent, head of centre or staff member, is closely related to any test takers. This must be done at the time when entries are submitted.
Please ensure that test takers' dates of birth are listed in the UK format (dd/mm/yyyy). Please also leave out diacritical marks, for example, ñ, ö, á, Ł, ó, from test takers' names. They will appear as blank spaces on results documents and certificates if included.
You must ensure that registrations are submitted by 17:00 UK time on the deadline date listed in the test timetable. Please ensure that you make allowances for time differences. Entries received after 17:00 may not be accepted.
Please see: Pearson English International Certificate (PEIC): Test Sessions & Key Dates, this shows the entry deadlines and all other key dates for PEIC test sessions.
Centres may accept late entrants on the day of the test if any test materials are left after they have been distributed to the already registered test takers. However, requests for extra test materials to cover potential late entrants will be declined.
|
|
General Edexcel Online (EOL) Information
|
Entries must be made online via the Edexcel Online (EOL) system. Before using EOL, you must register one primary user at your test centre. This should be the person responsible for the administration of student entries. The primary user should supply an email address that they access regularly.
If your centre does not currently have access to EOL, please call +44(0) 120 4770 696, selecting option 2.
If your centre requires amendments to the Head of Centre (HoC) or examinations/administration staff within EOL, please complete the Head of Centre and Exams Officer form. You are required to have access to EOL already to complete the form.
EOL accounts for centre examination staff are created and managed by Pearson. This will ensure only active roles are visible within Edexcel Online and that the correct contacts receive communications from us.
Pearson will continue periodically reviewing accounts, including those you have confirmed as being required. Any accounts which have not been logged into in the past 2 years will be permanently deleted.
Should you require urgent support with Examinations staff or HoC accounts, you can call us to speak to the expert team.
- International centres call +44(0) 120 4770 696 selecting option 2
Logging into EOL accounts using multi-factor authentication (MFA)
We have now introduced additional security to Edexcel Online, using Multi-factor authentication (MFA). This is an additional measure to protect user, centre and learner data. For detailed information, including downloading the app to your mobile device and using it to complete the sign-in process. Please see Pearson Portal Authenticator for details.
Please Note: With the introduction of MFA to EOL, all centres can only have one user per Edexcel Online account; hence, with additional security measures Pearson has in place, it will supersede JCQ ICE regulation 4.4, which states, "Email accounts used for secure material access must belong to named individuals or be a group email account accessed solely by individuals authorised by the head of centre to handle secure materials."
EOL Account Security
You'll need to use the e-mail address provided to you by your centre, and this e-mail address will become your EOL username. It is a requirement that all users are set up with a centre domain email address, e.g. name@centrename.com, as opposed to Gmail, Yahoo, etc.
It is best practice to change your password regularly, using a combination of uppercase and lowercase letters, numbers, and special characters for extra security.
If you have entered a password that matches one of the most commonly used passwords on the internet for additional security, you will see a warning message and be asked to choose an alternative.
Please see Edexcel Online: Resetting your Password for additional support.
Please note: In all cases, only the account holder should have access to their online account. Under no circumstances should any other person log in to your account, and your login details should never be shared. Failure to comply with these rules could result in a data breach which could constitute a breach of the terms and conditions of Pearson centre approval.
For information on EOL and how to use it to register candidates and perform other functions, see the detailed instructions below. There are also step-by-step video guides on EOL, which can be found on our qualifications website.
|
|
Logging on to EOL
|
1. To sign in, please go to https://edexcelonline.pearson.com; you will be asked to enter your usual Edexcel Online credentials, and once you click sign in, a verification code will be sent to the Pearson Authenticator app.
For further information, including downloading the app to your mobile device and using it to complete the sign-in process. Please see Pearson Portal Authenticator for details.
Edexcel Online home page
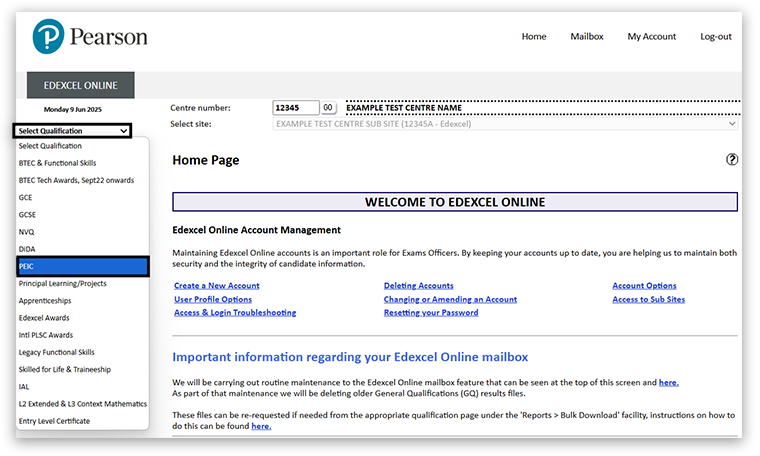
2. Once you have successfully logged on, you will be presented with the Edexcel Online home page. To access the Pearson Tests of English area, select the 'PEIC' option from the 'Select Qualification' drop-down menu on the left:
|
|
Pearson Tests of English (PEIC) Area
|
In the PEIC area of Edexcel Online, you can access information about candidates, results, and post-results services. These can be accessed through the menu in the top left-hand corner of the page:
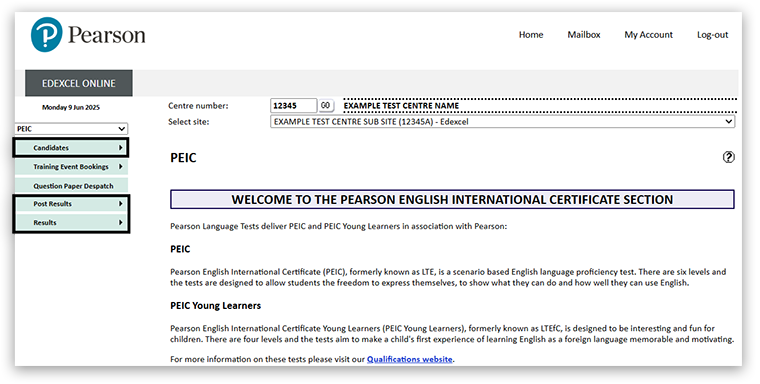
Through the 'Candidates' section, you can:
- choose which levels test takers will be sitting
- enter test takers for those levels
- search for and view individual test taker entries
- search for and view all test taker entries by level
Through the 'Results' section, you can:
- search for individual test takers' results
- search for and view all test takers' results by level
- download test takers' results
Through the 'Post Results' section, you can:
- submit a new request for Review of Marking
- track the status of a submitted request
|
|
Entering Test Takers for the Test
|
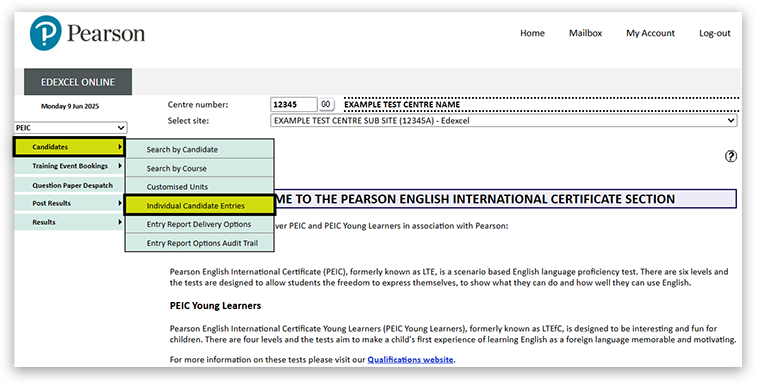
1. Hover your mouse over 'Candidates' from the top left-hand corner and then click on 'Individual Candidate Entries':
Choose the session
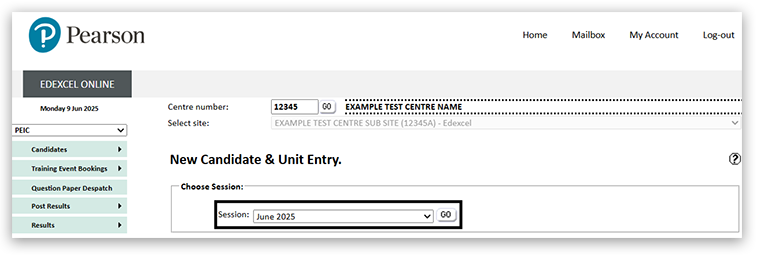
2. Select the session you wish to make entries for and click 'GO':
3. If you see the following error message, select the 'Completing the Customised Units Selection Process' title. If no customised unit message appears, continue with the process, choose the 'Registration Method' title:

|
|
Completing the Customised Units Selection Process
|
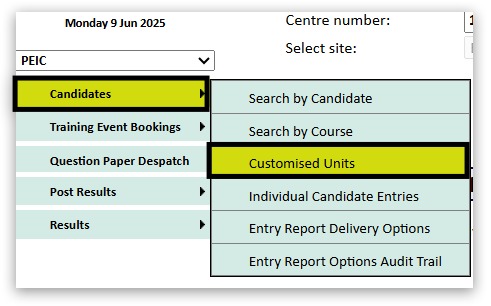
1. Hover your mouse over the 'Candidates' option, then click on 'Customised Units':
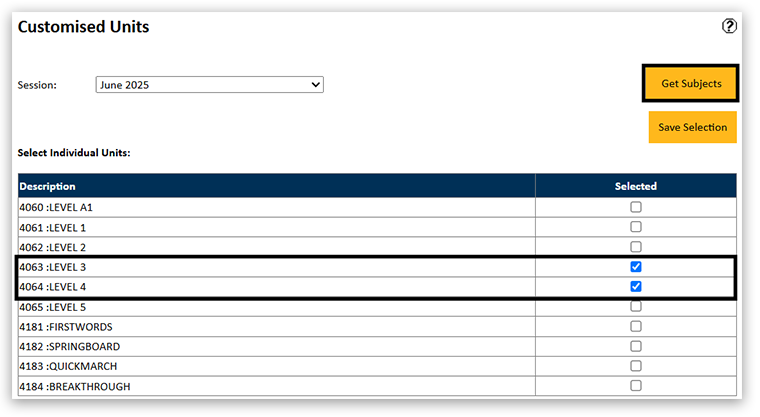
2. Select the session you wish to make entries for and click on 'Get Subjects':

3. Find the units you wish to make entries for in the session.
4. Once all units have been selected, click on the 'Save Selection' button:
5. A confirmation message will then display:

|
|
Registration Method
|
1. Once you select a session and click 'GO', you will then be given two options for entering test takers:
• Register Online
• Register By Spreadsheet
If you click 'Register Online', you can enter the test-taker details into the system manually. This is a suitable option if you are registering a small number of test-takers.
Please note: If you are entering a large number of test takers or already have test taker details stored electronically, we recommend you click on the 'Register by Spreadsheet' option.
The two options have the same result, and you can use a combination of both if you wish.

|
|
Registering Online
|
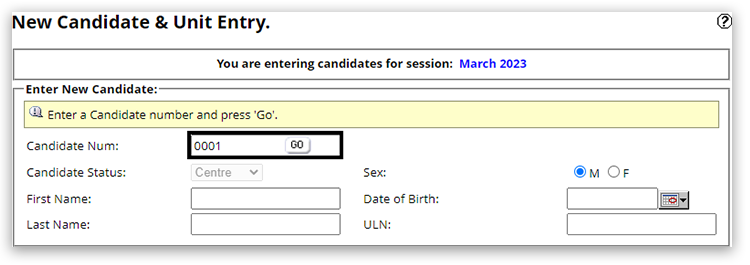
1. You can enter test-taker details by clicking on 'Register Online'. To enter a test taker, input their four-digit test taker number and click 'GO':

2. The following message will appear to inform you that this test taker number has not yet been used for the current test session:

Please note: If this test taker number has already been used for the current session, then the test taker's details will automatically appear. If these details do not match the test taker you are trying to enter, you will need to select a different number that has not been assigned to another test taker.
Input the test taker's information
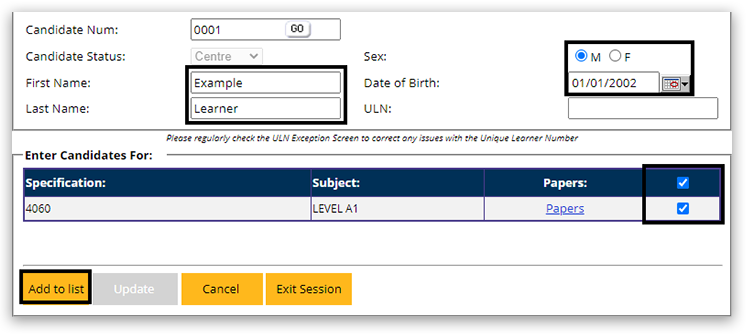
3. Next, enter the following information:
- Test takers' first name
- Test takers' last name
- Test takers' date of birth and gender (M or F)
Leave the 'ULN' field blank. This is not used for PEIC or PEIC Young Learners test takers.
Select the level
4. Finally, select the level or levels you wish to enter the test for and click 'Add to list':
5. The test takers' details will then appear at the bottom of the page. If all details are correct, click on 'Submit List':

|
|
Making Candidate Amendments
Correct an error
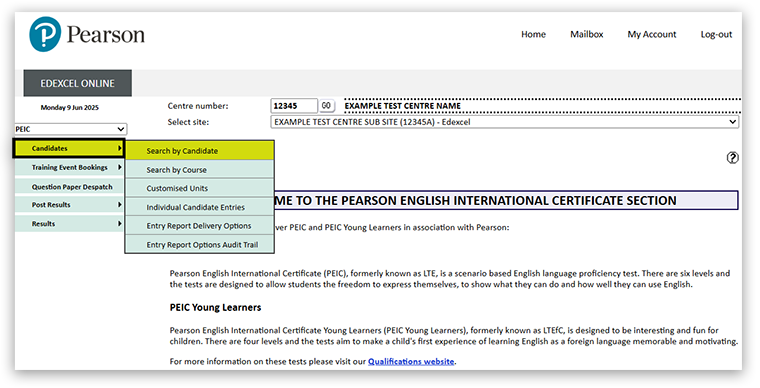
1. Having selected 'Candidates' on the menu at the top left side, click on 'Search by Candidate':
Confirm the correct information
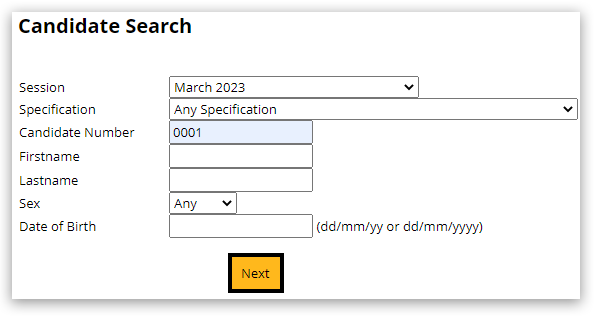
2. Once you have selected the correct session from the drop-down menu and entered the candidate details, click 'Next':
View candidate record
3. Then, click on 'Details' to view the candidate record:

Make candidate amendments
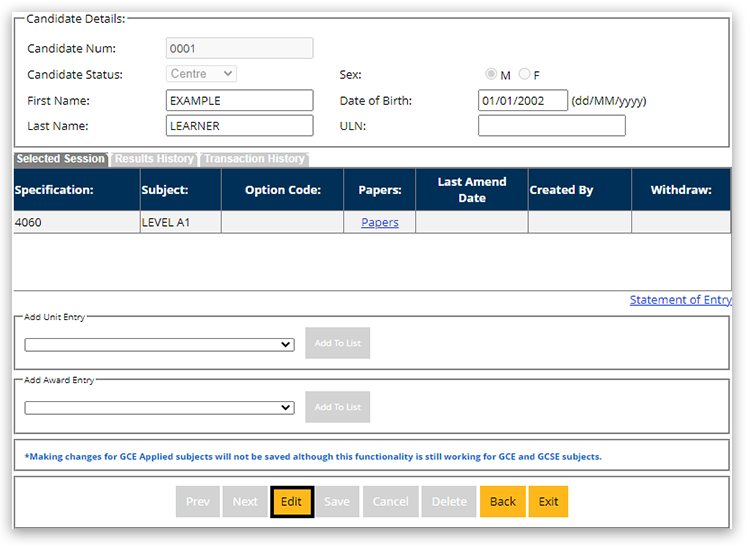
4. Once the candidate record has appeared, click 'Edit' to make your amendments.
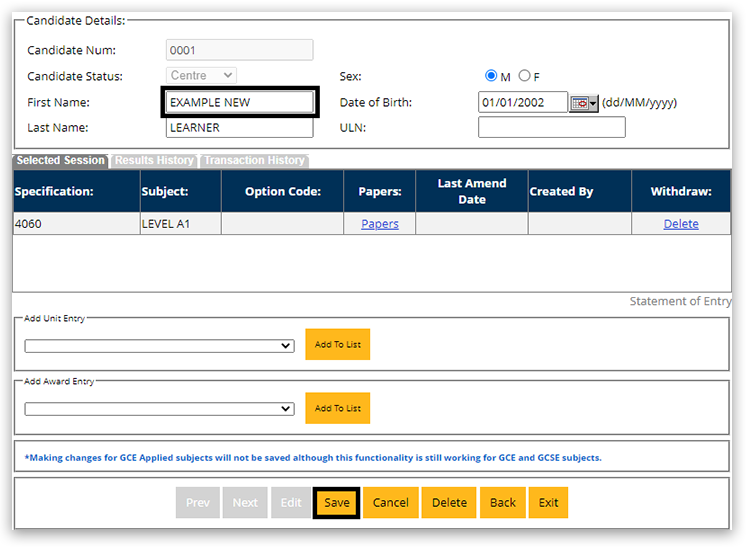
5. Once details have been amended, click 'Save':
6. Finally, click on 'Accept', and a message will appear to confirm the amendment(s) have been made successfully:

|
|
Registering by Spreadsheet
|
The 'Register By Spreadsheet' option allows you to prepare test taker details on a spreadsheet before uploading them to Edexcel Online.
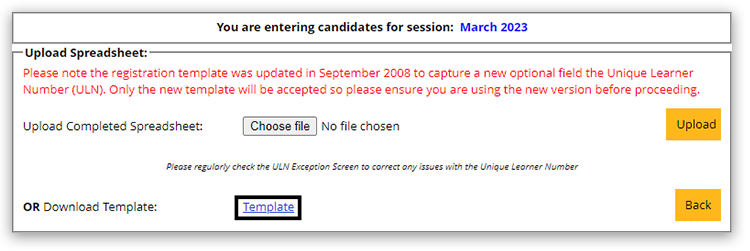
1. Click 'Register By Spreadsheet' to use this method:

Download the entries spreadsheet
2. You will first need to download the template spreadsheet to use this method,. To do this click on 'Template':
Save the spreadsheet
3. The spreadsheet will open up, and you should save it to your computer.
The formatting of the spreadsheet must not be changed in any way. The formats on the spreadsheet are set so that it will upload to Edexcel Online. Changing the formatting on the spreadsheet will mean that it will not load or will load with errors.
Completing the spreadsheet
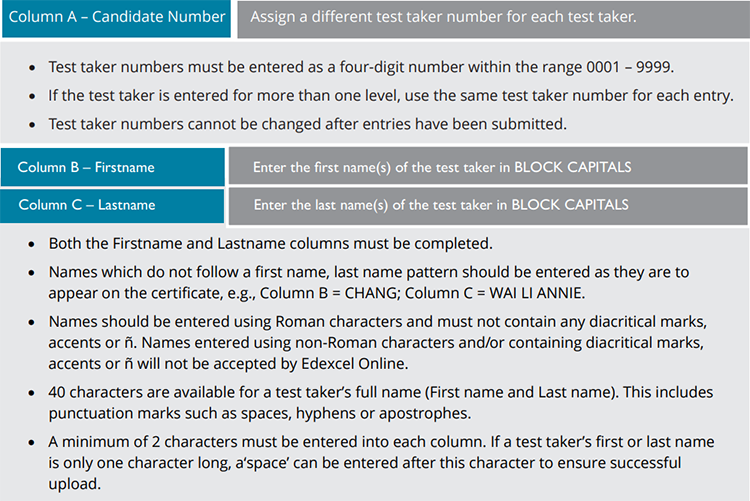
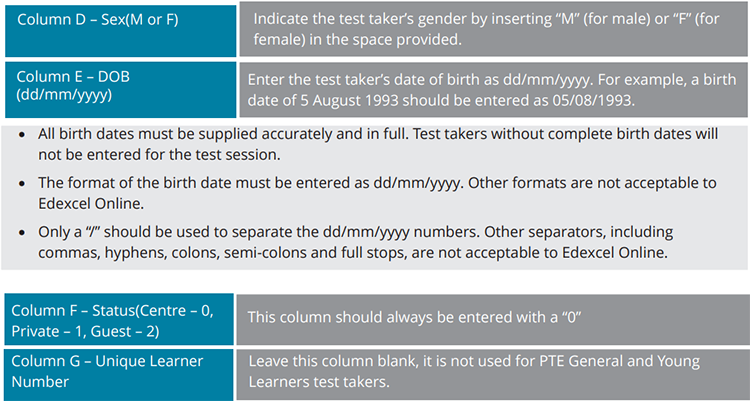
4. Enter the test taker details onto the spreadsheet as per the instructions below. You do not need to indicate which levels are being entered into the spreadsheet. You will be given the opportunity to assign levels after the spreadsheet has been loaded.
Please read the rules regarding completing the spreadsheet, highlighted in bold within the table, carefully.
Instructions for completing the registration spreadsheet
Save your spreadsheet
5. Now save your spreadsheet and give it a recognisable file name, e.g., 'March 2023 PEIC Entries'.
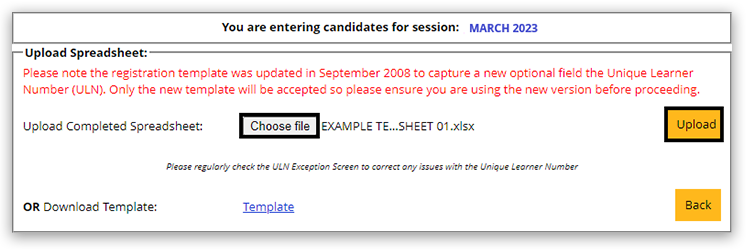
6. When you have completed and saved your spreadsheet, go back to Edexcel Online, select 'Choose file', locate and open the completed spreadsheet. Then, click 'Upload':
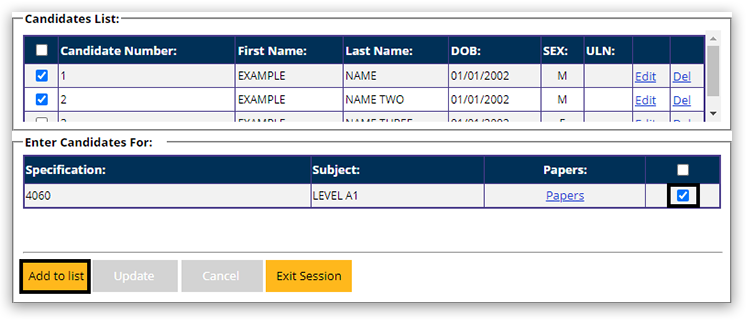
7. The list of test takers uploaded from your spreadsheet will appear under 'Candidates List'. Tick the box(s) in the candidate list to select learners you want to make entries for:

Choose test taker levels
8. Next, you will need to select the units for which you wish to enter test takers. To do this, tick the box(s) to choose the units you want to enter those learners for and select 'Add to list':
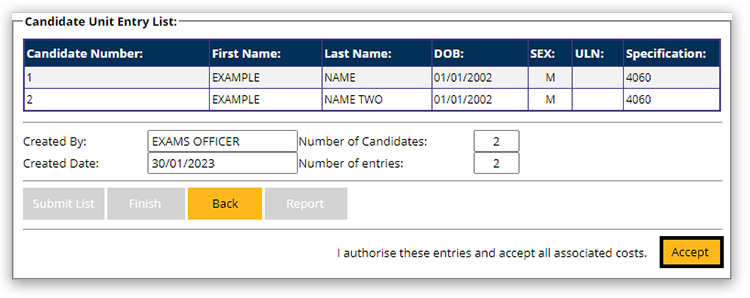
9. Next, scroll down and click 'Submit list':

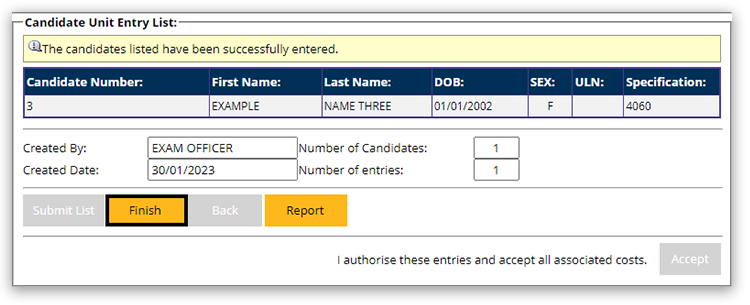
10. After you click 'Accept', a confirmation message will notify you that the entries have been made.

11. Finally, select 'Finish' to complete the process:
|
|
|
|
|---|


