| FAQ |
Introduction
|
To help with teacher and moderator workload and to ensure our commitment to working more digitally, we have developed a digital way for centres to send us their NEA/coursework samples.
The system is called the digital Learner Work Transfer portal (LWT). This means that coursework samples will be sent to us via this portal for A level History.
There is no hard copy submission of coursework samples.
|
|
Sample submission/marks deadlines
|
The coursework submission deadline is 15 May. This date is the usual deadline and is unchanged. Dates for summer exam timetables.
The names of the students who have been randomly selected for the sample will show on the portal from mid-April. Therefore, you will not be able to upload your sample earlier.
There are two processes:
1. Enter the marks awarded to your students by 15 May on Edexcel Online (EOL). Please see Edexcel Online: Submitting Coursework Marks demonstrating this process.
2. Uploading your students work to LWT by 15 May.
|
|
Submission requirements
|
For each student, centres are to submit the marked and moderated coursework, the coursework resource record and the completed coursework authentication sheet for each sampled student.
|
|
Preparing samples
|
Any of the approaches listed below are acceptable, and all three options are digital.
As before, you are only required to submit the named sample of your cohort's work and, in addition, the work of the highest- and lowest-scoring candidates.
Please do not zip files if you are uploading more than one document per student.
Option 1: Scanning
|
Students submit their work in hard copy as in previous years, and you scan and then upload the requested sample (most photocopiers have a scanning function).
1. Students submit their final coursework to you in hard copy, with a hard copy coursework resource record and coursework authentication sheet.
2. Mark and annotate your students' work by hand as usual and complete the coursework authentication sheet.
3. Moderate your centre's coursework submission as a whole by second marking all or a sample of your cohort. Show the moderation process by annotating the scripts, for example, in a different colour to the original marking or by adding a second marker's comments and initials.
4. When the portal is open for the students named in the sample, scan the annotated coursework, resource record and coursework authentication sheet and save as one PDF document using the file naming conventions below.
5. Upload the files for the students named in the sample showing on the portal.
|
|
Option 2: Separate marking notes
|
Students submit their final coursework to you digitally in an uneditable form (PDF or read-only Word document). You capture your marking and moderating comments using the marker/moderator comments sheet, which is uploaded with the student's coursework, coursework resource record and coursework authentication sheet. If you prefer, you can edit the marker/moderator comments sheet, or create your own version, provided it is clear.
1. Students submit their final coursework and coursework resource record to you digitally. You complete a coursework authentication sheet digitally.
2. Mark and annotate your students' work. Capture your first and second marker/moderator's comments on a marker/moderator comments sheet. These might refer to specific paragraphs on specific pages where you see evidence of performance on a particular AO at a particular level (comments that would previously have been marginal annotation). The comments of the first and second marker/moderator should be distinguishable. There is no intention to create additional workload for teachers, so there is no need to duplicate comments on the marker sheet and the coursework authentication sheet.
3. When the portal is open, for each sampled student, upload the coursework, coursework resource record, marker/moderator comments sheet and digital coursework authentication sheet using the file naming conventions below. You have the option on the portal to upload single or multiple documents for each student, so you may upload the coursework, coursework resource record, marker/moderator comments sheet and coursework authentication sheet separately if you wish.
4. Upload the files for the students named in the sample showing on the portal.
|
|
Option 3: End-to-end digital
|
Digital submission with digital in-text annotation using a digital marking platform.
1. Students submit their final coursework and coursework resource record in an uneditable form to you digitally. You complete a coursework authentication sheet digitally.
2. Mark and annotate your students' work using a digital marking platform.
3. Moderate your centre's coursework submission as a whole by second marking all or a sample of your cohort. Show the moderation process by annotating the scripts digitally. The comments of the first and second marker/moderator should be distinguishable.
4. For each student, upload the digitally annotated coursework, coursework resource record and digital coursework authentication sheet using the file naming conventions below. You have the option on the portal to upload single or multiple documents for each student, so you may upload the coursework, coursework resource record and coursework authentication sheet separately if you wish.
When the portal is open, upload the files for the students named in the sample showing on the portal.
|
|
|
|
File naming requirements / file types
|
When you create a file for each sampled student, then each file should use the following naming convention:
[centre #]_[candidate number #]_[surname]_[first letter of first name]
For example, Jane Smith, with candidate number 7890 at centre 12345, would have work in a folder titled: 12345_7890_Smith_J
If you are uploading more than one document for a student, please adopt the following naming approach:
- 12345_7890_Smith_J (for the coursework itself)
- 12345_7890_Smith_J_resource (for the coursework resource record)
- 12345_7890_Smith_J_CAS (for the coursework authentication sheet)
- 12345_7890_Smith_J_marking (for the marker/moderator comments sheet [option 2])
Please do not use zip files.
File types
Teachers may upload the following file types:
- read-only word documents
- PDFs
Please do not use zip files. You can hold CTRL down whilst selecting multiple files in the file explorer if you wish to upload multiple files for a single student in one go.
|
|
Data protection and privacy
|
The LWT is secure, so there is no need to encrypt the files you are uploading.
|
|
How to use the LWT Portal to submit Non-examined assessments
|
If you need further support, step-by-step guidance and screenshots are provided below.
If you have any issues with the LWT system, please contact our Customer Services Teams on 0344 463 2535.
1. Accessing the portal
|
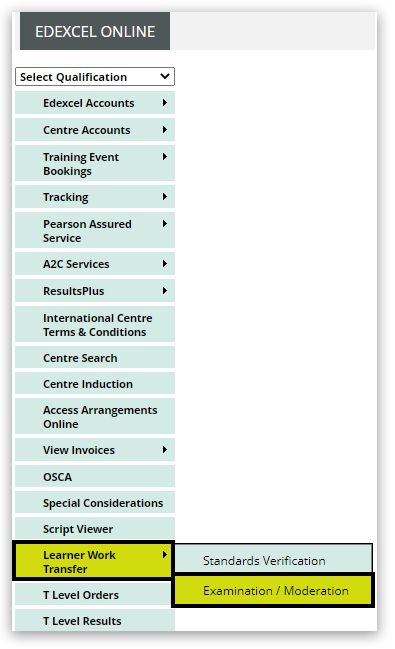
Access the portal through your Edexcel Online account under 'Learner Work Transfer'. Make sure that you have enabled pop-ups in your browser in order to access the LWT portal:
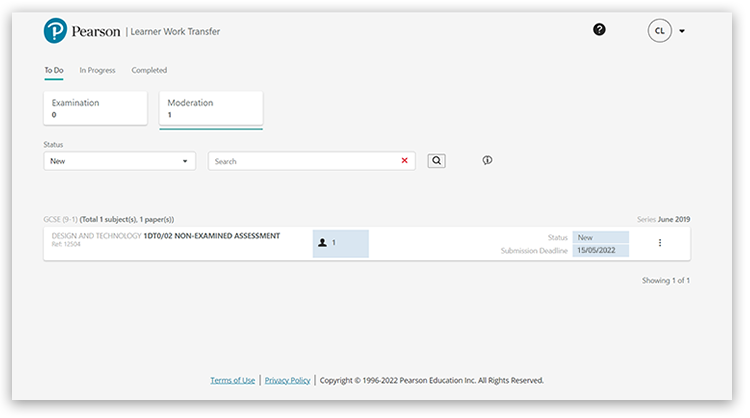
An example of the Learner Work Transfer dashboard is shown below. Depending on the state of the request ('To Do', 'In Progress' or 'Completed'), the default view will start on a particular tab:
- To Do = New requests
- In Progress = Submission started, and some material uploaded but not submitted
- Completed = Submitted. These are read-only and can't be edited
For A level history, make sure you select 'Moderation'. Your centre's moderation sample will be visible in the 'To Do' list:
|
|
2. Viewing candidates in the portal
|
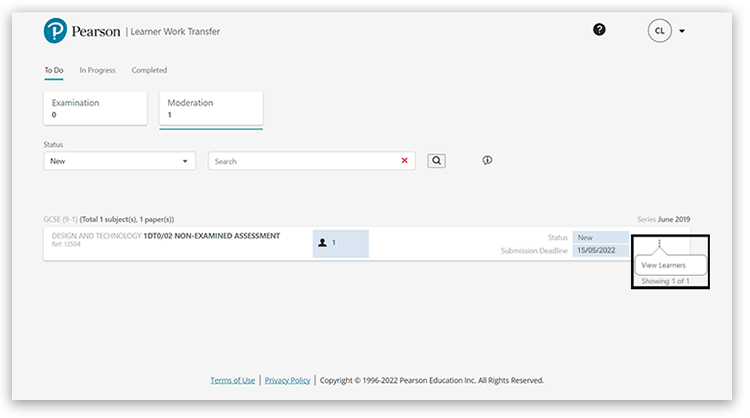
The search box can be used to narrow down the components as required. Click the three vertical dots on the right of the request, then 'View Learners' to open the request and find the requested moderation sample:
You will be presented with a list of all learners entered for the unit. If you have additional learners who have not yet been entered, please make entries for them through the usual process; this should be updated within 24 hours.
If you have uploaded evidence for some learners, when the new entries have been added, the request will show a status of 'In Progress (C)' to represent a change.
|
|
3. Uploading files
|
There are three main sections where materials can be uploaded in LWT.
- Administration Materials - Administrative documents at the cohort level, e.g. assignment checking service feedback.
- Shared Files - Files that are used for more than one student. Files can be linked to specific students.
- Learners - Individual upload section for each learner. Linked share files will also appear.
Checking Students
- Underneath the Administration (yellow section) and Shared Files (blue section), you will see a randomly generated list of named students whose work is requested for moderation.
- Check the list to see if it includes the highest and lowest-scoring students - you may need to add these students.
- Check to see if any students listed are absent or have not submitted any coursework - you may need to substitute students. If a withdrawn student is still showing, change the status from 'Present' to 'Absent':

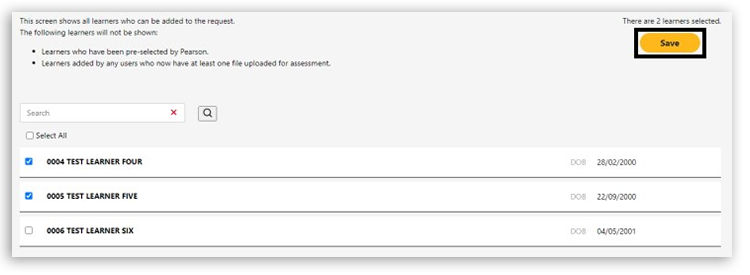
To add additional students to your sample, select 'Manage Learners' and select additional students from the list:

Once additional learners have been selected, click 'Save':
To upload learner evidence, click 'Browse' under the learner:

This will open a file explorer. Click on a file to upload or hold down the 'Ctrl' key to select multiple files, then click 'Open':
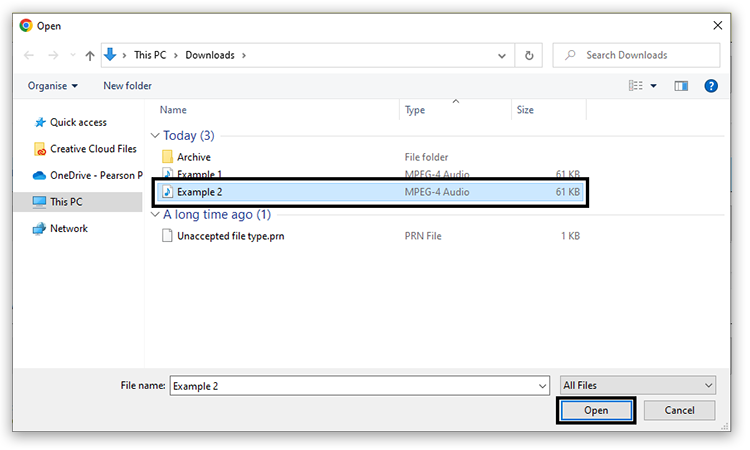
Alternatively, drag the files from your computer onto the grey area of the page, where it states: 'Drop files here':

Files uploaded will then display an 'Uploaded' state:

Files are then checked to ensure they are in an accepted format and aren't password protected. Once the checks are successful, it is updated to 'Accepted' or 'Rejected'. If you have uploaded the incorrect document, you can remove it by clicking the 'X' next to the file name:


Please do not zip files. You can hold CTRL down whilst selecting multiple files in the file explorer if you wish to upload multiple files for a single student in one go. LWT is a secure platform, so there is no need to encrypt files.
The portal accepts the most popular file types including, mp3, mp4 and jpeg files. A full list of accepted file types.
For any learners who were absent for the assessment, the centre should have their status changed to 'Absent' using the 'Status' dropdown. This will take the place of completing the attendance register.
If the learners work is not available, for example, where special consideration is being applied, the status should be changed to 'No Evidence'. Special consideration should be completed via an application following the usual process.

Attendance registers can be uploaded in the 'Administration Material' section. You should only upload documents in this section that are required for the course at the cohort level.
Once you have at least one file uploaded per learner and indicated their Status (Absent/No evidence), you can use the 'Submit Request' option at the top of the screen and also from the 'In Progress' dashboard:
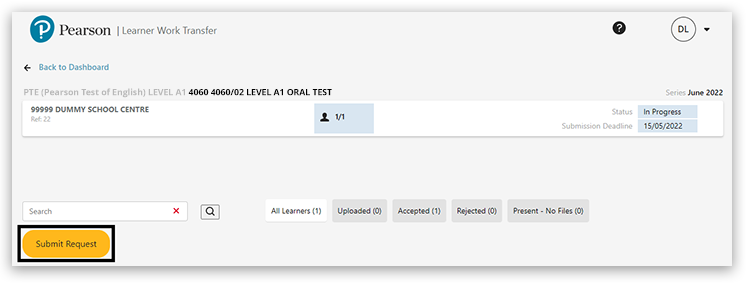
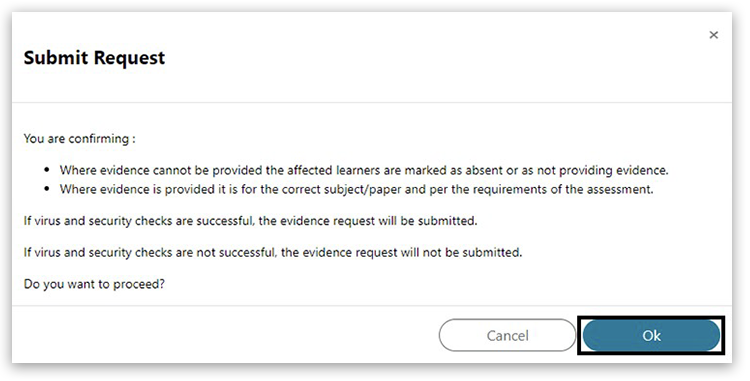
Once a request has been submitted, you will receive a confirmation message; click 'Ok' to proceed:
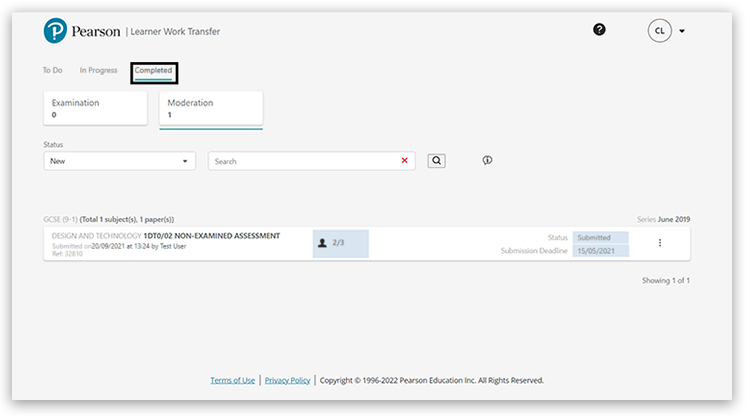
This will send the request to your assessor, and you will no longer be able to add, edit or remove evidence. The completed tab shows requests which have been submitted for assessment:
If the assessor finds that the wrong material has been uploaded, they can return the request to the centre. You should receive an email from the assessor or Pearson. This will show in the 'In Progress' tab with the status 'Returned'. You can then add or remove files before resubmitting the request:
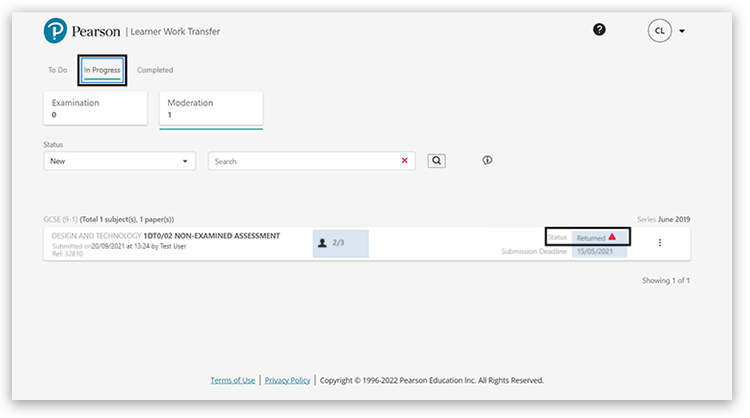
If you realise that incorrect documents have been uploaded and submitted, please contact us immediately to request the submission be returned for amendment.
|
|
4. Linking a file to multiple learners
|
Use the 'Shared files' feature to upload a file that must be shared between multiple learners. You can drag and drop files into the grey space or browse to the required file within your system:

You will see the document status of 'Uploaded':

Once the file shows as 'Accepted', you will then be able to link the learners to it. Click on the 3 vertical dots on the right of the shared files area and select 'Manage Shared Files':

Use the dropdown to select a file to see a list of available learners:

Use the checkboxes on the left to select all learners or select specific learners:
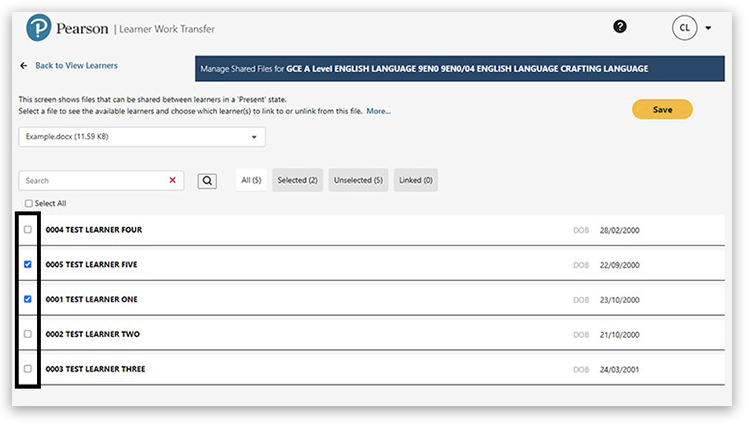
When all relevant learners have been selected, click on the 'Save' button:
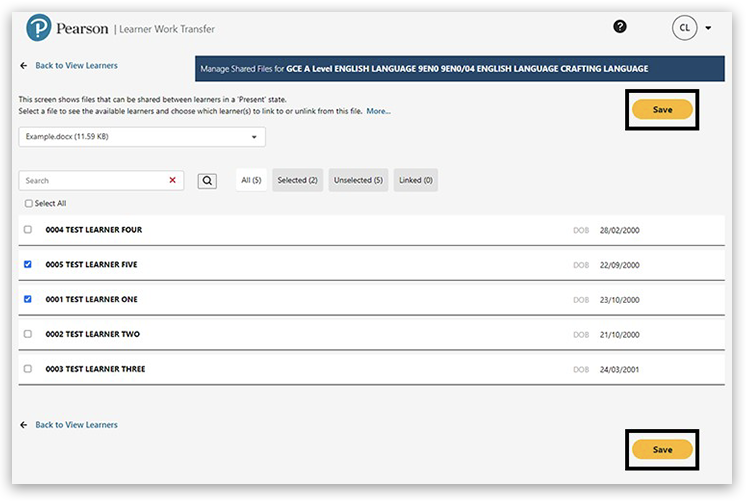
A confirmation message will be displayed at the top of the page:

Click on 'Back to View Learners' at the top or bottom of the page to return to the request:
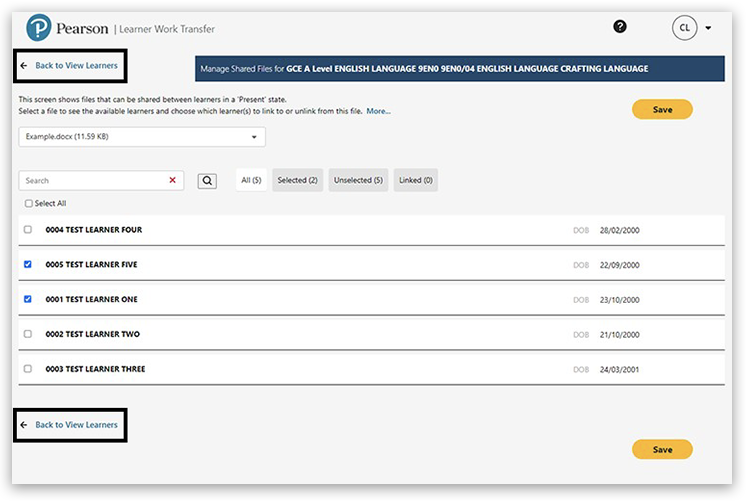
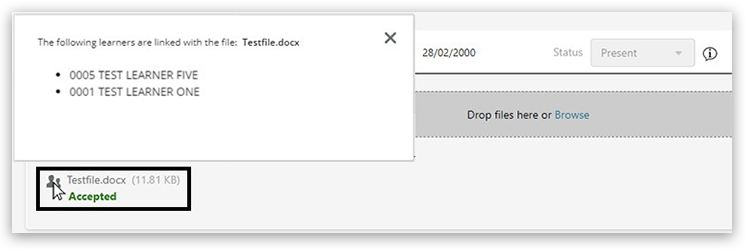
The 'shared file' icon next to the filename indicates that this file is associated with multiple learners. Clicking on this icon will display a pop-up list of the learners associated with that file:
|
|
5. File with the same name
|
A file cannot be uploaded directly to a learner or via the shared files functionality if another file with the same name and format has already been uploaded to that card. So, for example, you cannot upload multiple pdfs called 'speaking form' to the same learner or within the shared file section. If this occurs, an error message is shown:

However, each learner can have a file called 'speaking form' uploaded to their card or associated to them via the shared files functionality. Please see section 4 'Linking a file to multiple learners' above for guidance.
If uploading one form for multiple candidates, please name it with your centre number and the form name. There is no need to name a form with multiple candidate numbers if it is linked to them on LWT in this way.
|
|
|
|
Support and contact
|
A full list of general FAQs on LWT.
If you have any further questions about this guidance or the qualification that require the help of our subject advisor, Mark Battye, you can contact him at TeachingHistory@pearson.com or via the Customer Support Portal.
When on the portal, enter your customer type (if not already set up) and use the request type 'Administration & Assessment of Qualifications':
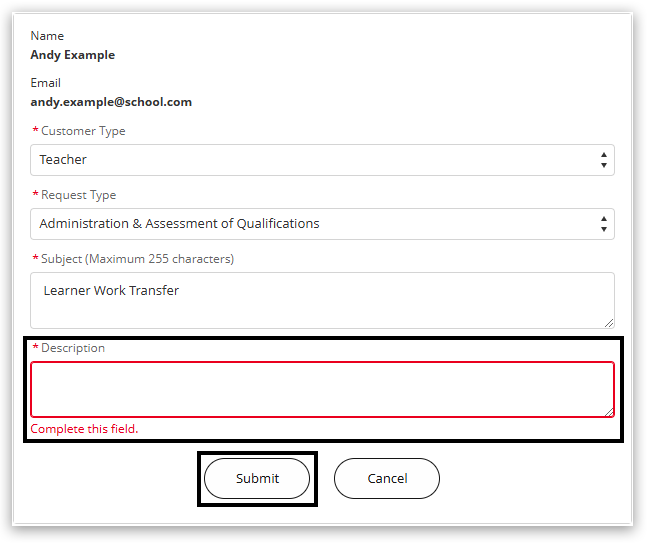
In the 'Subject' field, enter Learner Work Transfer, and in the 'Description' field, enter the qualification and subject and describe your query. Then click 'Submit'. Further detailed guidance on submitting a case record.
|
|
Back to Learner Work Transfer (LWT) index page. |
|
|---|


